Firmware Testing
Online Tests
When a firmware format is set in the metainfo.xml file
various tests are performed on the firmware by the LVFS.
This includes checking file headers, magic numbers or CRCs for the chosen
update protocol.
The update protocol can be changed on the LVFS website, and the correct tests
will be run automatically.
Firmware that has unresolved test failures cannot be pushed to the
testing or stable remotes.
For some tests the failure can be waived by a QA user.
UEFI Capsule
Capsule updates should be uploaded with a valid CAPSULE_HEADER
that contains a GUID listed in the metainfo.xml file.
For reference, the UEFI capsule header is defined like this:
typedef struct {
EFI_GUID   CapsuleGuid;
UINT32     HeaderSize;
UINT32     Flags;
UINT32     CapsuleImageSize;
} EFI_CAPSULE_HEADER;
If the header is missing or invalid the test will fail, although the failure can be waived by a QA user.

DFU
DFU updates must be uploaded with a valid UFD footer
that matches the device revision number with a correct CRC value.
Although these can be waived by a QA user, firmware uploaded without a footer can be installed on any DFU device, which makes this unwise.

dfu-tool from the fwupd project can convert a raw firmware image to
include a DFU header, for example:
$ dfu-tool convert dfu old.raw new.dfu $ dfu-tool set-vendor new.dfu 0xabcd $ dfu-tool set-product new.dfu 0x1234
Blocklist
All update binaries, and shards contained within are scanned for strings which may indicate a problem with the firmware. Example strings are:
DO NOT SHIPTo Be Defined By O.E.M
Although these can be waived by a QA user, firmware should not be uploaded that have this text.

Additionally, the blocklist plugin will search for other information that may
add a component claim. For instance the computrace claim will be added to any
firmware shipping the official Computrace agent, and it will be visible to users
when viewing the component information.
Microcode
All UEFI updates are decompressed, and if a processor microcode is found then it is compared with older firmware versions that have been uploaded to the LVFS.
If the microcode has been downgraded then the test will fail, although the failure can be waived by a QA user.

PE Check
Any EFI shards are loaded and will have their PE signatures checked. If any certificate is out of date, or otherwise invalid a test failure will appear. This failure can be waived by a QA user.

End-to-End testing
Embargo remotes
Once the firmware is in an embargo remote anyone in the vendor group can then
download the vendor-embargo.conf from the LVFS metadata page
and install it locally on their Linux system.
Warning
The vendor-embargo.conf file should never be emailed to anyone not in your
vendor group.
If you want to allow access to an ODM or OEM this can be done by transferring the ownership of the firmware.
To use the embargo remote:
Download a new version of
vendor-embargo.conffrom the LVFSPut your LVFS email in the
Username=field invendor-embargo.confGenerate a LVFS user token for the
Password=field invendor-embargo.confInstall it to
/etc/fwupd/remotes.dif using a distribution build of fwupd, or/var/snap/fwupd/common/var/lib/fwupd/remotes.dif using the snap buildUse
fwupdmgr refreshto download the new metadata
Warning
Do not rename the
vendor-embargo.conftolvfs.conf– both are requiredDo not manually modify the existing
lvfs.conffileYou should use a fwupd versions newer than 1.7.9 – use
sudo apt remove fwupdthensudo snap install fwupdto get a newer fwupd on Ubuntu LTS.
After waiting a few minutes for the LVFS to regenerate the vendor group metadata,
the user can do fwupdmgr refresh to get the new metadata which includes
the new firmware release.
Once the new metadata is available on the local system the device can be updated
either using fwupdmgr update or using GNOME Software.
Note
You can force GNOME Software to update the metadata catalog using the refresh button in the left hand side of the header bar in the Updates panel.
Testing and stable remotes
You should only move stable firmware to testing and stable after completing an end-to-end test with the embargo remote.
Warning
It can take a few hours to regenerate the testing and stable remotes
and up to 24 hours for users to download the new metadata catalog.
Most vendors see a large spike in downloads the day after they move a firmware
to stable, and then a steady decay the days after.
Debugging Metadata
If you’ve moved the firmware to embargo, waited for the remote to regenerate,
and then done fwupdmgr refresh and still do not have any update available you
can check for the new release in the downloaded metadata using vim:
$ cat /var/lib/fwupd/remotes.d/NAME_OF_VENDOR-embargo/metadata.xml.gz | gunzip | less
<?xml version='1.0' encoding='UTF-8'?>
<components origin="lvfs" version="0.9">
  <component type="firmware">
    <id>com.8bitdo.fc30.firmware</id>
    <name>FC30 Device Update</name>
    …
    <requires>
      <id compare="ge" version="0.9.3">org.freedesktop.fwupd</id>
    </requires>
    <screenshots>
      <screenshot type="default">
        <caption>Unplug the controller, hold down L+R+START for 3 seconds until both LEDs are flashing then reconnect the controller.</caption>
        <image>https://raw.githubusercontent.com/hughsie/8bitdo-firmware/master/screenshots/FC30.png</image>
      </screenshot>
    </screenshots>
    <releases>
      <release timestamp="1520380800" urgency="medium" version="4.10">
        <location>https://fwupd.org/downloads/2999ee63c0cff96893c1614955f505cb4f0fa406-8Bitdo-SFC30_NES30_SFC30_SNES30-4.10.cab</location>
        <checksum type="sha1" filename="2999ee63c0cff96893c1614955f505cb4f0fa406-8Bitdo-SFC30_NES30_SFC30_SNES30-4.10.cab" target="container">a60593fd1dbb40d7174c99f34b5536f45392bf6c</checksum>
        <checksum type="sha1" filename="N30_F30_firmware_V4.10.dat" target="content">f6e4fe9c56585e200b8754d59eb1e761090bd39f</checksum>
        <description>
          <p>Enhanced the stability of the Bluetooth pairing.</p>
        </description>
        <size type="installed">46108</size>
        <size type="download">53407</size>
      </release>
      <release timestamp="1506038400" urgency="medium" version="4.01">
        <location>https://fwupd.org/downloads/fe066b57c69265f4cce8a999a5f8ab90d1c13b24-8Bitdo-SFC30_NES30_SFC30_SNES30-4.01.cab</location>
        <checksum type="sha1" filename="fe066b57c69265f4cce8a999a5f8ab90d1c13b24-8Bitdo-SFC30_NES30_SFC30_SNES30-4.01.cab" target="container">78ef2663beaa952415c3719447b0d2ff43e837d8</checksum>
        <checksum type="sha1" filename="bluetooth_firmware_v4.01.dat" target="content">f6cacd2cbae6936e9630903d73c3ef5722c4745c</checksum>
        <description>
          <p>Fixed input lag problem when used with other controllers.</p>
        </description>
        <size type="installed">45596</size>
        <size type="download">52085</size>
      </release>
    </releases>
    <provides>
      <firmware type="flashed">7934f46a-77cb-5ade-af34-2bd2842ced3d</firmware>
      <firmware type="flashed">7a81a9eb-0922-5774-8803-fbce3ccbcb9e</firmware>
    </provides>
  </component>
  …
Here you can see a lot of information. Some interesting points:
The 4.10 and 4.01
.metainfo.xmlfiles have been combined into one<component>using the<id>to combine them.They always share the same set of screenshots
They always share the same set of GUIDs
They always share the same set of requirements
You can also examine the stable metadata the same way:
$ cat /var/lib/fwupd/remotes.d/lvfs/metadata.xml.gz | gunzip | less
Signed Reports
After each update the fwupdmgr client tools allow the end user to submit a “report” which is used by the firmware owner to validate the firmware deployment is correct. Any failures can be analyzed and patterns found and the metadata can be fixed. For instance, the failures might indicate that the required fwupd version needs to be raised to a higher value, or that the update requires a specific bootloader version.
Part of the anonymous report also includes the device checksum which can be used to verify the firmware is being deployed correctly. All users can submit reports, and there is no way to verify the report has not been modified by the end user before submission. This means reports should not be used for trust, and the information only used when statistically significant.
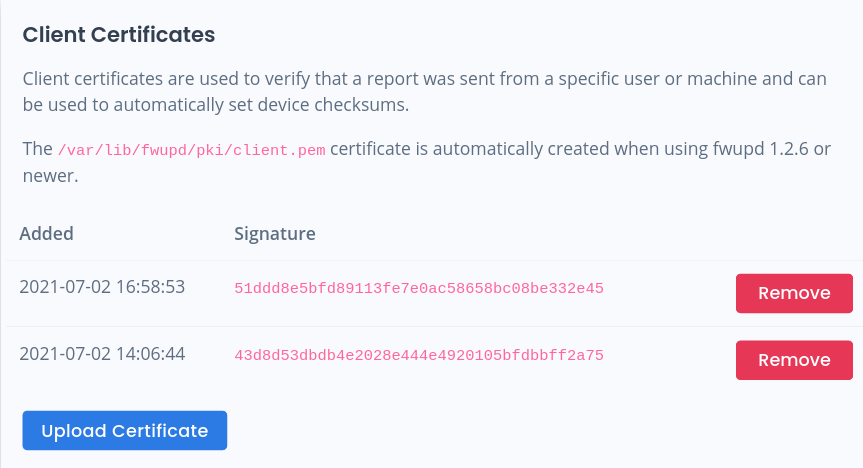
There is provision in fwupd 1.2.6 and newer to actually sign the report contents
using a per-machine certificate.
This allows the LVFS to verify the report has not been modified after being signed,
and also means the LVFS now knows what user submitted the report.
If the LVFS knows which user (and thus which vendor) owns which certificate the
report can then be used for trusted operations.
For instance, setting the “golden” device checksums for the update, or verifying
that the firmware was indeed tested on specific hardware.
To do this, the user must add at the certificate from each machine used for testing:
The user can then upload reports to the LVFS in a trusted way by signing the report:
$ fwupdmgr refresh
$ fwupdmgr update
…reboot…
$ fwupdmgr report-history --sign
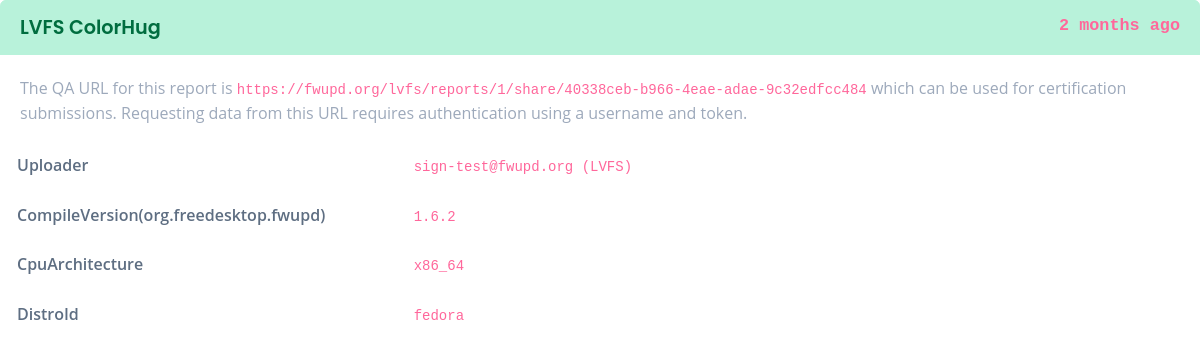
This is then reflected in the public device pages for vendors that have public accounts:

Note
The version of fwupd is shown for peripheral updates, and the system DMI information is used for system updates.
Interestingly, this information is also exported into the public metadata, e.g.
…
<artifacts>
  <artifact type="binary">
    …
    <testing>
      <test_result date="2021-07-14">
        <vendor_name id="1">LVFS</vendor_name>
        <device>LENOVO ThinkPad X1 Carbon 7th</device>
        <os version="34" variant="workstation">fedora</os>
        <previous_version>1.2.6</previous_version>
        <custom>
          <value key="RuntimeVersion(org.freedesktop.fwupd)">1.6.2</value>
        </custom>
      </test_result>
    </testing>
  </artifact>
</artifacts>
…
Additionally, the signed report can be made available to 3rd parties, typically as part of a hardware certification program.
Note
Sharing the URL allows a user (possibly outside your organization) to read the specific report details but not modify the firmware or report in any way.
Signed Reports With Token
In some automated tested scenarios the image on the DUT is ephemeral and manually uploading the host-generated signing key to the LVFS is not appropriate.
In this case, allow the user to upload a report using Basic authentication so that the LVFS can treat it as “signed” by the report uploader.
This means the user can do (on fwupd >= 1.9.1):
$ fwupdmgr modify-remote lvfs Username sign-test@fwupd.org
$ fwupdmgr modify-remote lvfs Password V92KVWWCA5VKYUSX
$ fwupdmgr refresh
$ fwupdmgr update
…reboot…
$ fwupdmgr report-history
… and the LVFS treats that as if --sign was used if the authentication succeeds.
Warning
If using very old versions of fwupd (e.g. 1.7.9) you will need to manually replace the
@ symbol in your username with %40.
For example, using Username=sign-test%40fwupd.org
Offline Reports
A detached test report can be used when the test machine has no public internet connection.
This means the user can do (on fwupd >= 1.9.10):
$ fwupdmgr install filename.cab
…reboot…
$ fwupdmgr report-export --sign
$ cp *.fwupdreport /media/YOUR_USBDISK/
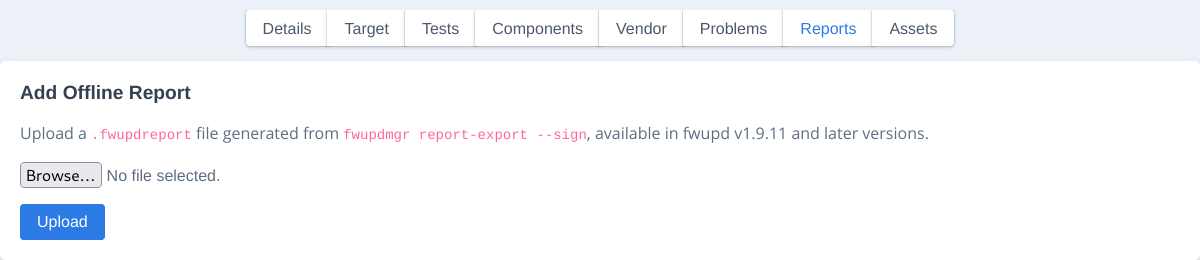
Then on a different (internet-connected) machine, log into the LVFS, navigate to the specific
firmware page and click the Reports tab.
From there the /media/YOUR_USBDISK/*.fwupdreport files can be uploaded:
Note
The LVFS uses the current logged in user to assign the test user and vendor group.