ChromeOS firmware testing
Prerequisites
A Chrome OS device.
A device to test that is supported by the installed version of
fwupdin Chrome OS, i.e. the device firmware update plugin is working.
Prepare Chrome OS for testing
Pre-conditions
The Chrome-based device must be updated to the recent version of Chrome OS (see official documentation: https://chromium.googlesource.com/chromiumos/docs/+/main/developer_guide.md#Installing-Chromium-OS-on-your-Device )
WiFi connection with unrestricted access to LVFS site.
For reference, we have used Samsung Galaxy Chromebook 2 (codename
hatch).
Developer Mode
The Chrome-based device must be switched to development mode: https://chromium.googlesource.com/chromiumos/docs/+/main/developer_mode.md#dev-mode
Recovery mode : Hold Esc + Refresh
 and press Power.
Enter Developer Mode :
On screen “Please insert a recovery USB stick or SD card.” press “Ctrl+D”.
By pressing “Enter” confirm turning OS verification OFF.
The system will be restarted.
After that step on every boot the OS will warn you about OS verification disabled. Press “Ctrl+D” to proceed.
The first boot after restart will set your device into Developer Mode, all data on the device will be wiped out!
During the first boot, set the network and log into the account.
Go to Settings and check IP address assigned to your device:
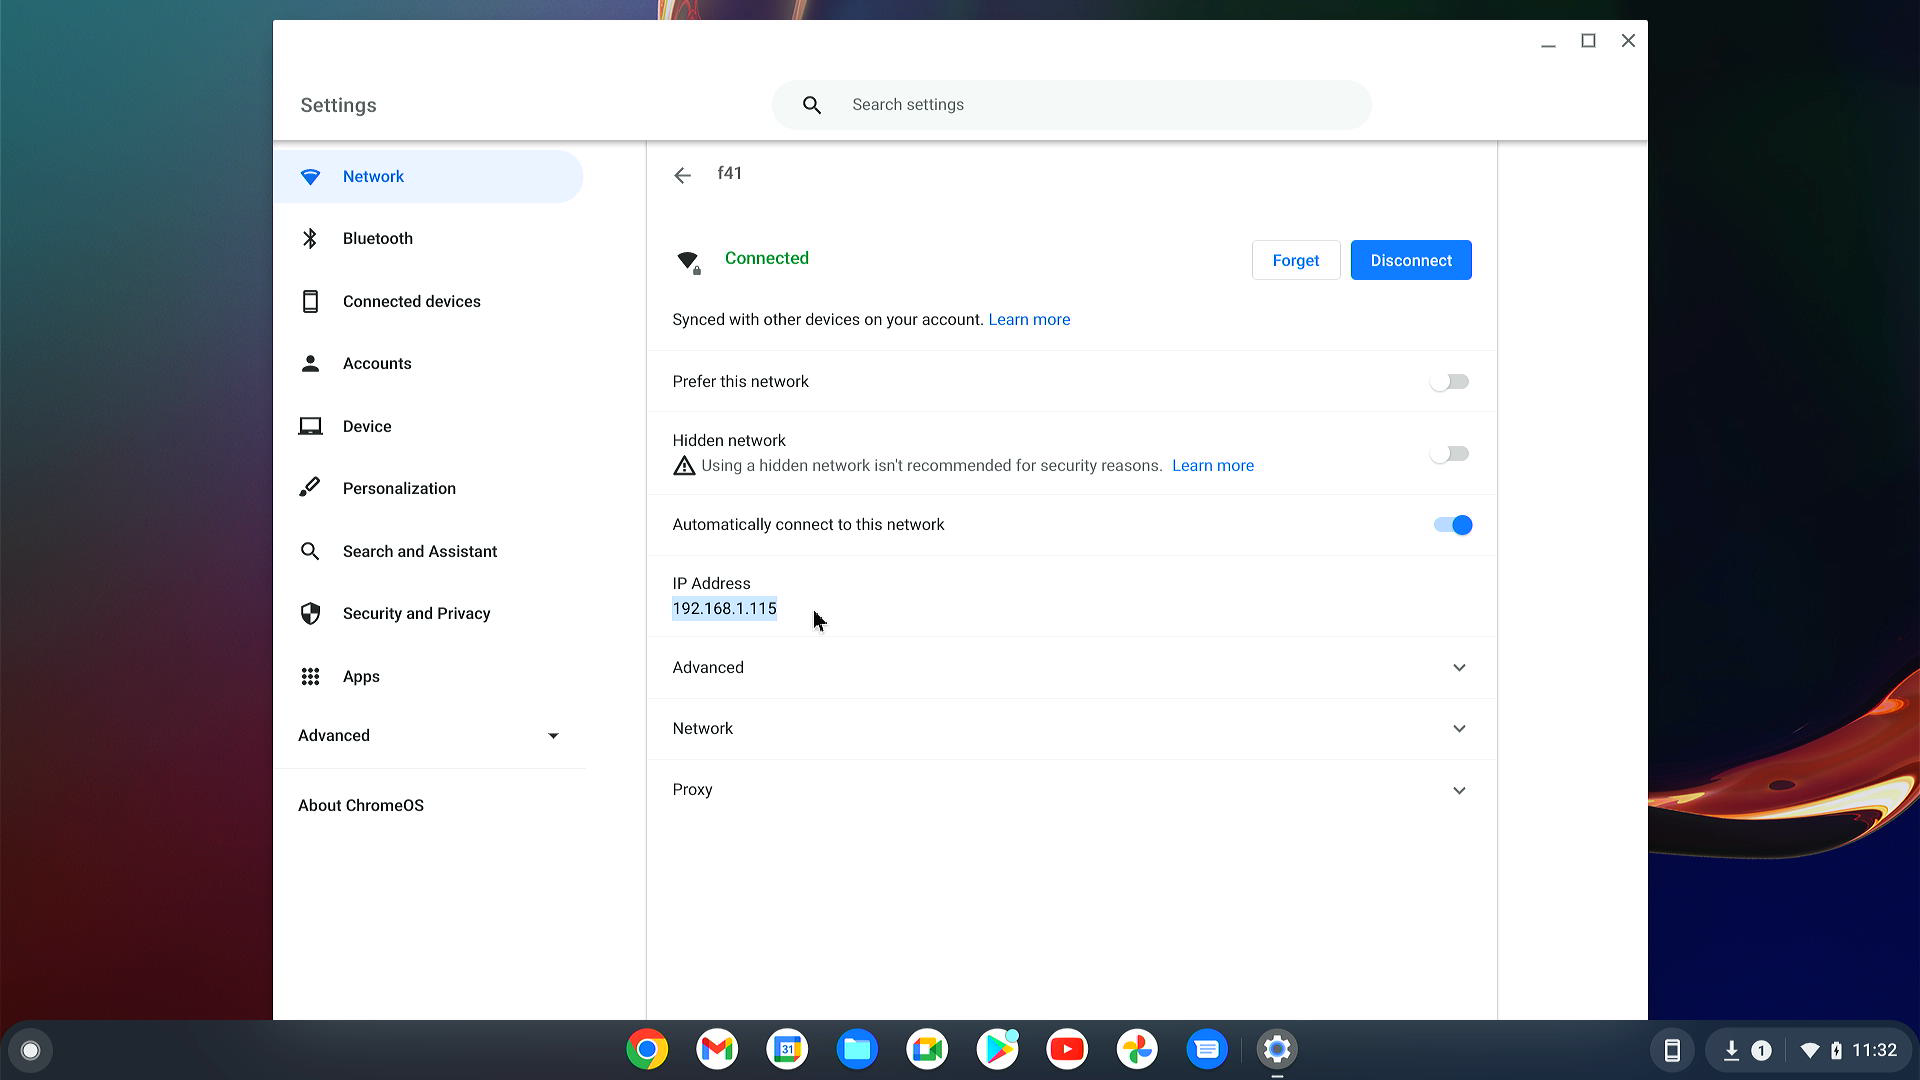
The IP address will be used for remote access to the device over SSH – for instance
192.168.1.115it is assigned.
Disable rootfs verification
By default the filesystem is mounted in ReadOnly mode. For testing purposes we have to do some changes in configuration, meaning we have to disable rootfs verification.
Switch to the linux console on ChromeBook by pressing: “Ctrl + Alt + →” ( ‘→’ or ‘F2’ on top row).
You should see the login prompt asking for login.
Use username “chronos” for login, password is not needed.
Run command to remove the FS verification:
sudo /usr/share/vboot/bin/make_dev_ssd.sh --remove_rootfs_verification
Sometimes the command above fails and asks to provide additional parameter “ –partitions ” with the partition ID.
Please check the output carefully:
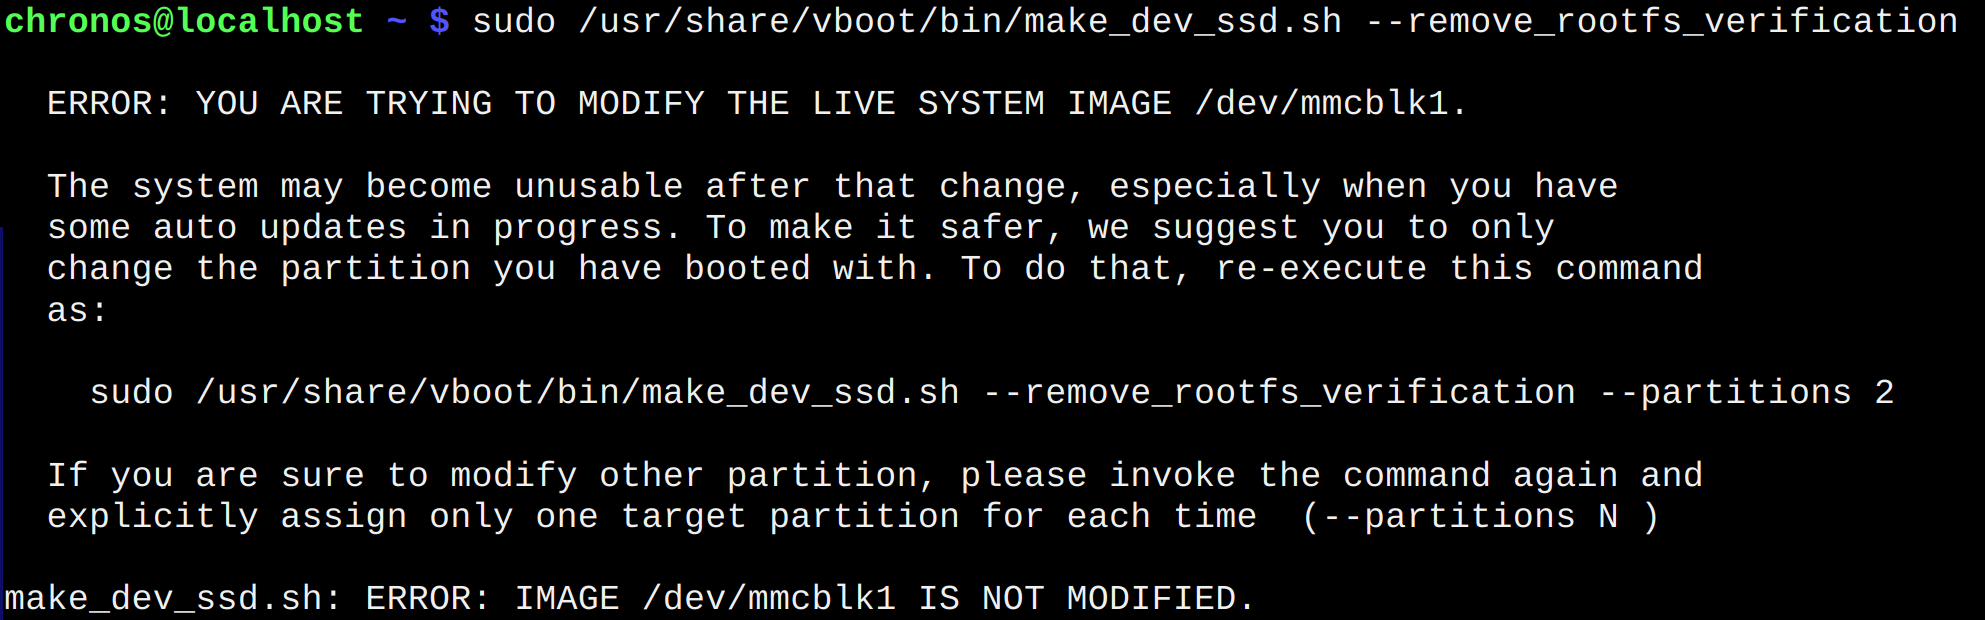
For
hatchthe script is suggesting the 2-nd partition, so need to retry the command with suggested parameter:sudo /usr/share/vboot/bin/make_dev_ssd.sh --remove_rootfs_verification --partitions 2

Reboot the system with command:
sudo reboot
Allow fwupd access to HID devices for ChromeOS versions prior to v107
ChromeOS versions prior to version 107 have an issue with managing the HID devices like mice or keyboard. In this case we need to avoid this restriction.
Switch to linux console on ChromeBook by pressing: “Ctrl + Alt + →”
You should see the login prompt asking for login.
Use username “chronos” for login, no password should be asked.
Run command to give access to HID and
fwupd:sudo usermod -a -G hidraw fwupd
Restart the
fwupdwith the command:sudo restart fwupd
Enable SSH access
It is recommended to enable SSH access allowing QA engineer remote connection to the ChromeBook instead of typing all commands directly.
Switch to linux console on ChromeBook by pressing: “Ctrl + Alt + →”
You should see the login prompt asking for login.
Use username “chronos” for login, no password should be asked.
Run command to enable SSH access:
sudo /usr/libexec/debugd/helpers/dev_features_sshSet password for the
rootuser:sudo passwdpassword
test0000is recommended as default for ChromeOS devices under the test.Reboot the system with command:
sudo rebootNow it is possible to use remote access with SSH tool to the Chromebook from your Linux host using the password above:
$ ssh root@192.168.1.115
Password:
localhost ~ #
Pack a fresh firmware into the CAB format
The CAB file is the container containing the firmware file and XML file with the
metadata for LVFS and fwupd update daemon.
For the purpose of this documentation we will use the ColorHug open hardware colorimeter.
Firmware files
ColorHug device uses the following firmware file:
firmware.bin
Metadata files
The metadata format is described in documentation: https://lvfs.readthedocs.io/en/latest/metainfo.html
For composite devices, both LVFS and fwupd allow the use of a single CAB
file. In this case we have to prepare and pack several XML files with metadata,
one file for each firmware.
In the case of ColorHug, only one metadata file is requested:
firmware.metainfo.xml
The name of the files doesn’t matter – the only requirement is the extension .metainfo.xml.
Metainfo file for ColorHug
The metainfo firmware.metainfo.xml file for the device:
<?xml version="1.0" encoding="UTF-8"?>
<component type="firmware">
  <id>com.hughski.ColorHug.firmware</id>
  <name>ColorHug</name>
  <summary>Firmware for the Hughski ColorHug Colorimeter</summary>
  <description>
    <p>
      Updating the firmware on your ColorHug device improves performance and adds new features.
    </p>
  </description>
  <provides>
    <firmware type="flashed">40338ceb-b966-4eae-adae-9c32edfcc484</firmware>
  </provides>
  <url type="homepage">http://www.hughski.com/</url>
  <metadata_license>CC0-1.0</metadata_license>
  <project_license>GPL-2.0-or-later</project_license>
  <categories>
    <category>X-Device</category>
  </categories>
  <custom>
    <value key="LVFS::VersionFormat">triplet</value>
    <value key="LVFS::UpdateProtocol">com.hughski.colorhug</value>
  </custom>
  <releases>
    <release version="1.2.6.1" date="2016-12-02" urgency="low">
      <description>
        <p>This release fixes prevents the firmware returning an error when the remote SHA1 hash was never sent.</p>
      </description>
      <url type="source">https://github.com/hughski/colorhug1-firmware/releases/tag/1.2.6</url>
    </release>
  </releases>
</component>
Generation of the CAB file
The generation of the CAB file is required for uploading to LVFS and for local
testing as well. The gcab tool is used for the generation under Linux:
$ gcab --create --nopath --verbose ColorHug-1.2.6.cab firmware.metainfo.xml firmware.bin
The ColorHug-1.2.6.cab will be created containing 2 files: 1 metadata XML
and 1 firmware binary.
The generated file will contain only the minimal amount of the metadata. No additional information for firmwares validation, checksums or signatures are included at this step!
Upload file to ChromeBook
To test the generated file you need to copy it onto a ChromeBook device.
The simplest method is to copy it via ssh from the build host.
Please substitute the IP address from the example below with the IP address of
your device, and use the password you’ve set during ChromeBook setup
(test0000 in the example):
$ scp ColorHug-1.2.6.cab root@192.168.1.115:~/
Password:
Alternatively you may want to use other methods for accessing the CAB file from ChromeBook device, for instance: own HTTP server, network share, USB mass storage and others.
Local test of the CAB file
Access to ChromeBook
Gain terminal access on ChromeBook via ssh (recommended) or with virtual
console.
SSH method
Use ssh tool from your host to login as root user to ChromeBook (use IP
address of your device and password you’ve set):
$ ssh root@192.168.1.115
Password:
localhost ~ #
Physical access method
Switch to the linux console on ChromeBook by pressing: “Ctrl + Alt + →” ( ‘→’ or ‘F2’ on top row).
You should see the login prompt asking for login.
Use username
rootfor login, and password you’ve set (test0000by default):localhost login: root Password: localhost ~ #
Virtual console via crosh
Start
croshterminal by pressing “Ctrl + Alt + T” in GUIIn the opened terminal window type
shellcommandSwitch to
rootaccountcrosh> shell chronos@localhost / $ sudo bash localhost / #
Check if the device is supported by fwupd
Attach the device to ChromeBook
Collect information about the attached device, supported by
colorhugplugin:localhost ~ # fwupdmgr get-devices Nightfury │ ├─ColorHug: │ Device ID: d9c9e0eb29c6f35160d400949c14db42f473f4d4 │ Summary: An open source display colorimeter │ Current version: 1.2.5 │ Vendor: Hughski Ltd. (USB:0x273F) │ Install Duration: 8 seconds │ GUIDs: 40338ceb-b966-4eae-adae-9c32edfcc484 │ afdcc391-6c33-5914-b4d2-b4dd71fe9c5a │ 6bc5ff27-d631-5660-9991-6d24954c6f90 ← USB\VID_273F&PID_1001 │ 4841a9e4-e5c8-5107-a83e-d6c6d9c21248 ← USB\VID_273F&PID_1001&REV_0002 │ Device Flags: • Updatable │ • Supported on remote server │ • Device can recover flash failures │ • Unsigned Payload
The most interesting here are device GUID(s) and device flags: Updatable
meaning that the device updates are supported by fwupd manager, and
Supported on remote server flag shows there are firmwares available on the
LVFS site.
Upgrade the device with development FW CAB file
As mentioned above, the development variant of locally generated CAB file was
not digitally signed, so it is not possible to install it on Chrome OS based
devices with the fwupdmgr tool due security reasons:
localhost ~ # fwupdmgr local-install --allow-reinstall --allow-older ColorHug-1.2.6.cab --json
firmware signature missing or not trusted; set OnlyTrusted=false in /etc/fwupd/daemon.conf ONLY if you are a firmware developer
To avoid that issue it is possible to use 2 methods:
Modify
/etc/fwupd/daemon.confto allow untrusted firmwares, and restart the daemon:localhost ~ # restart fwupd
This method is suitable for developers only who are testing the new FW and not recommended for other purposes .
Warning
This should never be done on production machines.
Use standalone
fwupdtooltool to update the device with development CAB file:localhost ~ # fwupdtool install --allow-reinstall --allow-older ColorHug-1.2.6.cab --json
Upgrade the device through internal repository
By default Chromium OS has a local vendors repository enabled (see
/etc/fwupd/remotes.d/vendor-directory.conf), so any CAB file placed into the
local directory /usr/share/fwupd/remotes.d/vendor/firmware will be automatically
detected and could be used for the device upgrade or downgrade:
localhost ~ # cp ColorHug-1.2.6.cab /usr/share/fwupd/remotes.d/vendor/firmware/
Note
Please check the Updates with LVFS section below how to update or downgrade the firmware with the GUI or CLI.
LVFS
Chromium OS does not use the Linux Vendor Firmware Service (LVFS) for secure updates directly.
Instead Google is using its own mirror copied from the LVFS stable remote.
That’s why we have to add LVFS remotes to the Chrome OS device during the testing.
Account
Please request the access to LVFS portal according the https://lvfs.readthedocs.io/en/latest/apply.html
LVFS: remotes
There are 4 LVFS remotes available for the CAB file uploading:
private – should be the initial remote for uploading, the CAB file with FW uploaded to private could be accessible only via direct link
embargo – remote with non-public catalog of FWs available for Vendor only; used during development and QA testing. The remote may be added to the Chrome OS just like a common remote, so all
fwupdfunctionality is available for testing.Should be used for testing by Vendor before giving access to FW to end-users.
testing – this remote is generally available for end users, encouraged enough to deal with the potential risk of the freshest FW version.
stable – the main remote with released FW considered as good enough for the mass market.
This remote is enabled by default on Chrome OS and Linux systems with installed
fwupd.
CAB file repacking
The uploaded CAB file would be repacked on the LVFS side:
The metadata is validated during this step.
Missing parts would be added into metadata if not provided by metadata XML file, checksums for instance.
The signature will be added to FW and metadata. Only signed CAB files are trusted by default on end-user devices.
Any change of the metadata in the internal editor will cause repackage and resignation of the CAB file, so the new file will be generated.
LVFS: private remote
Upload the FW CAB file to LVFS private remote
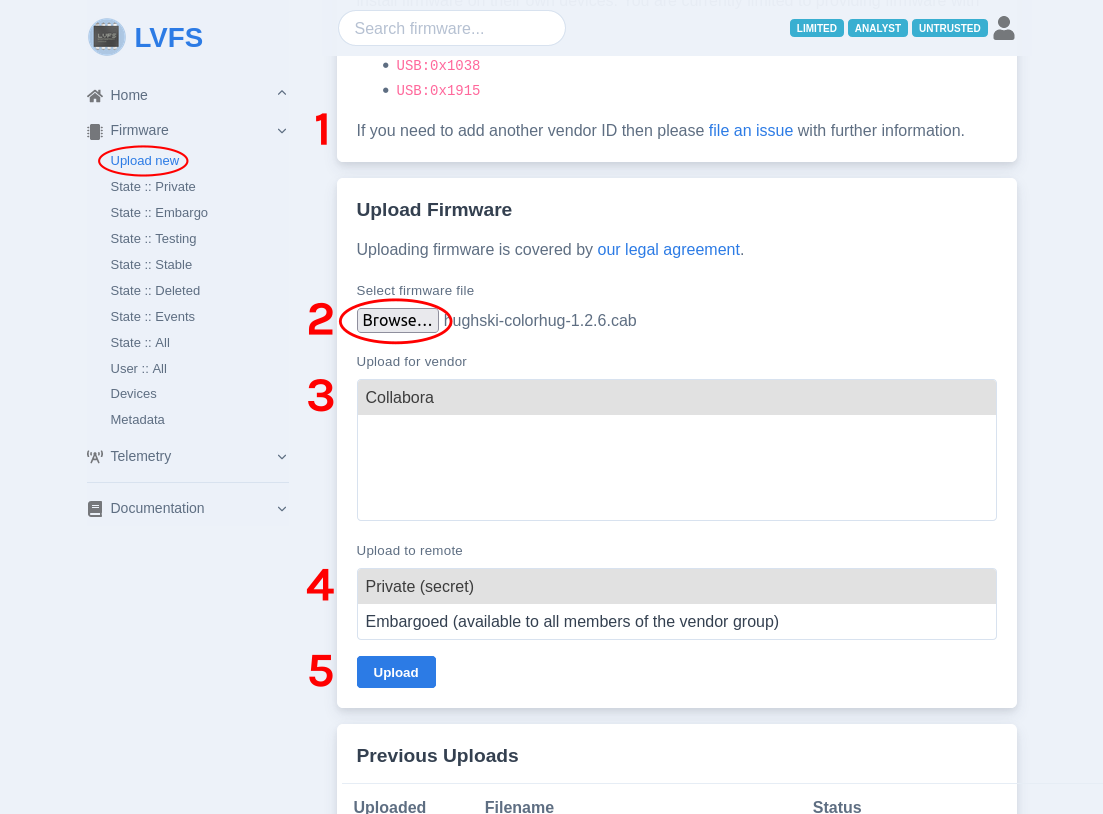
Go to section “Firmware” -> “Upload new”
Select the generated CAB file from your host
Choose your vendor name (Collabora in example)
Choose “Private” remote
Press “Upload”
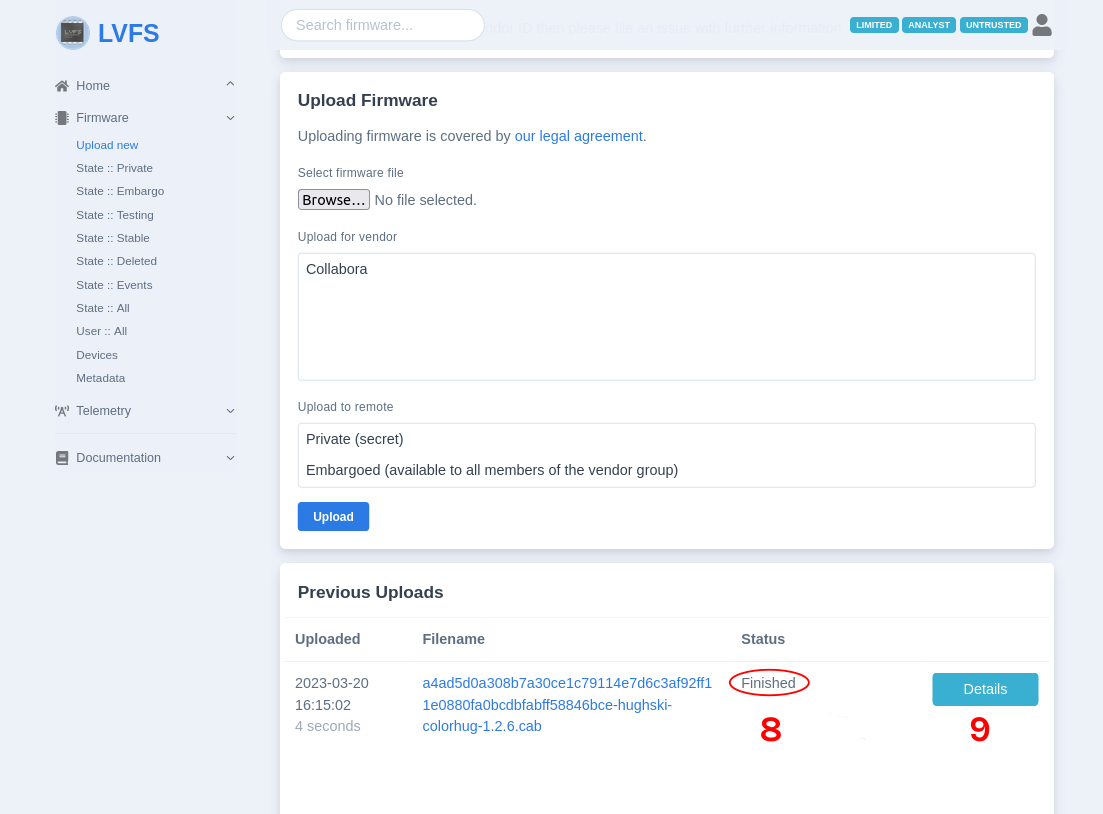
The page will be refreshed
Scroll down to the “Previous uploads” section, you should see the confirmation with the date, filename and the status of uploaded file
Refresh the web page until “Complete” status
Press “Details” button
Install the FW CAB file from the private remote
The private remote doesn’t provide the catalog with uploaded files. Instead you have to go to the CAB file you are interested in and get its URL for the direct download and install.
Choose the needed firmware from private repo (“Firmware” -> “State::Private”) and press the button details.
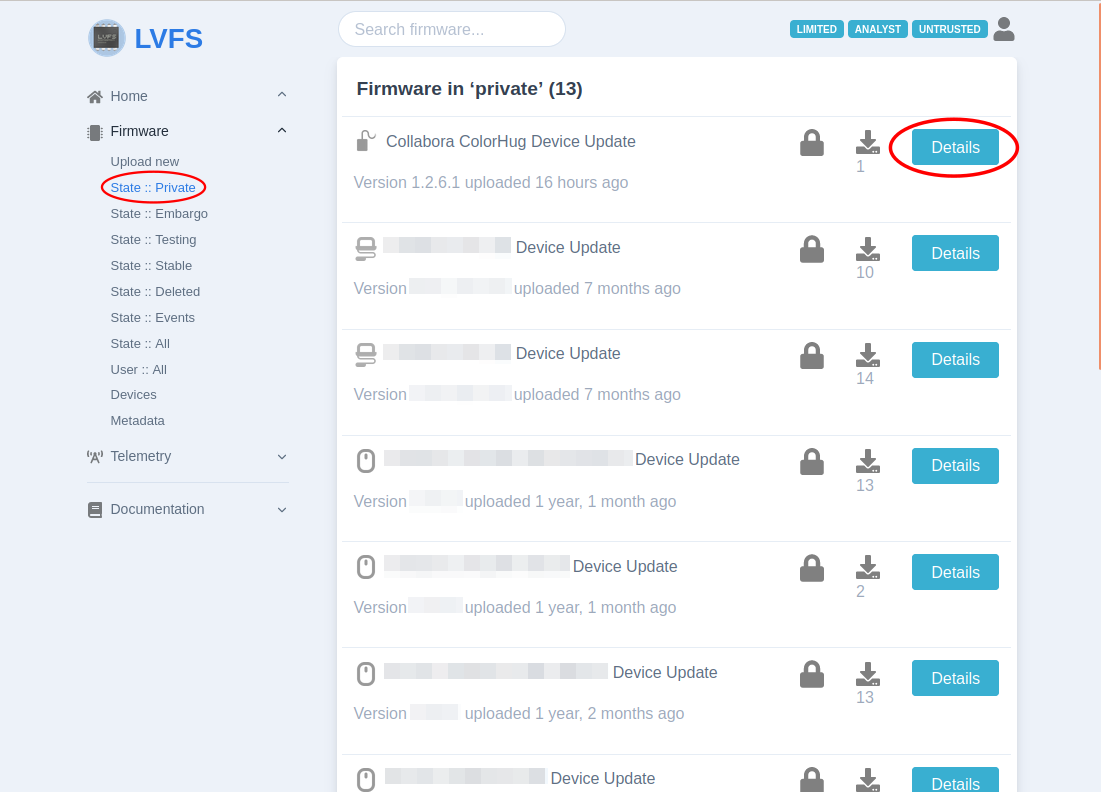
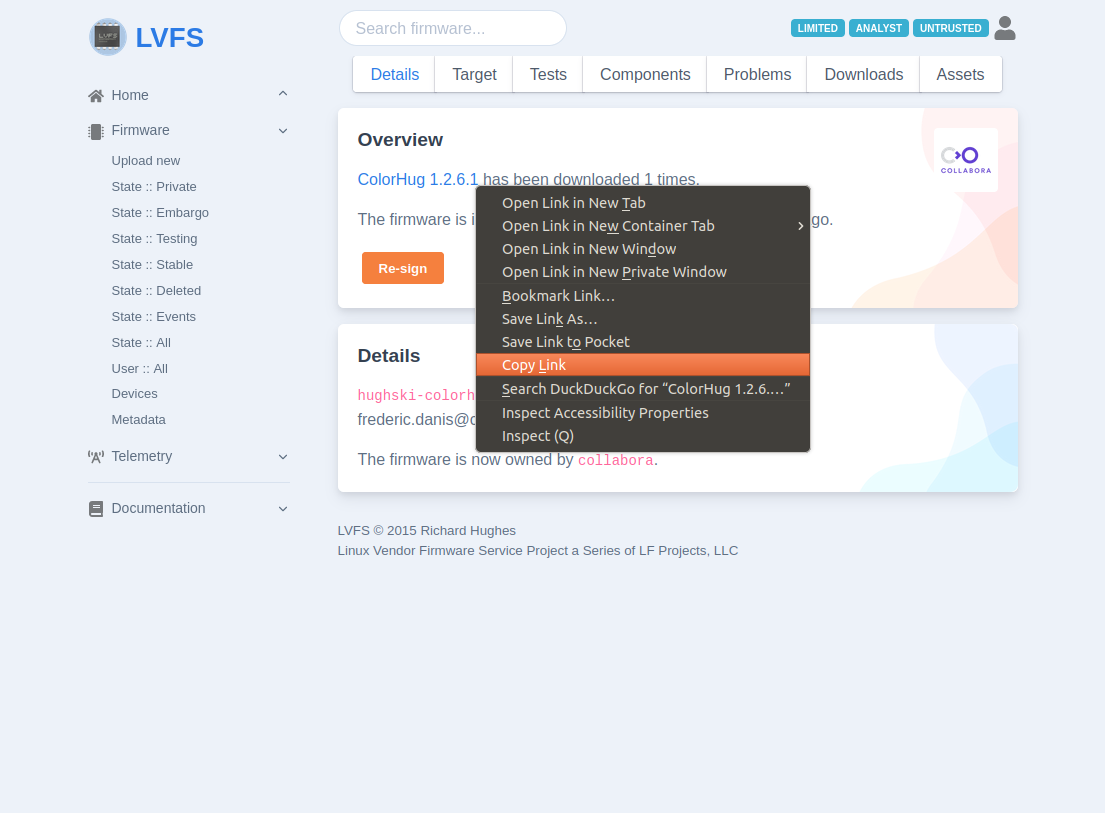
In the “Details” tab you will see the “Overview” block with the name of the uploaded firmware. The right click (or long press) will give you the URL of the signed CAB file.
Gain access to the Chrome OS device terminal as described in the Access to ChromeBook section.
Via terminal install the CAB file from the LVFS by copied URL:
# fwupdmgr install https://fwupd.org/downloads/c6fbb716abbb204d98f12edf1f146b6406f39b1eade741b353c15a86f5da8278-hughski-colorhug-1.2.6.cab Waiting… [***************************************] Less than one minute remaining… Successfully installed firmware
LVFS: Embargo remote
The embargoed remote provides the catalog of available firmwares but it is restricted to vendor, so only the vendor is able to use it or share for 3-rd parties.
Move the FW CAB file to embargoed remote
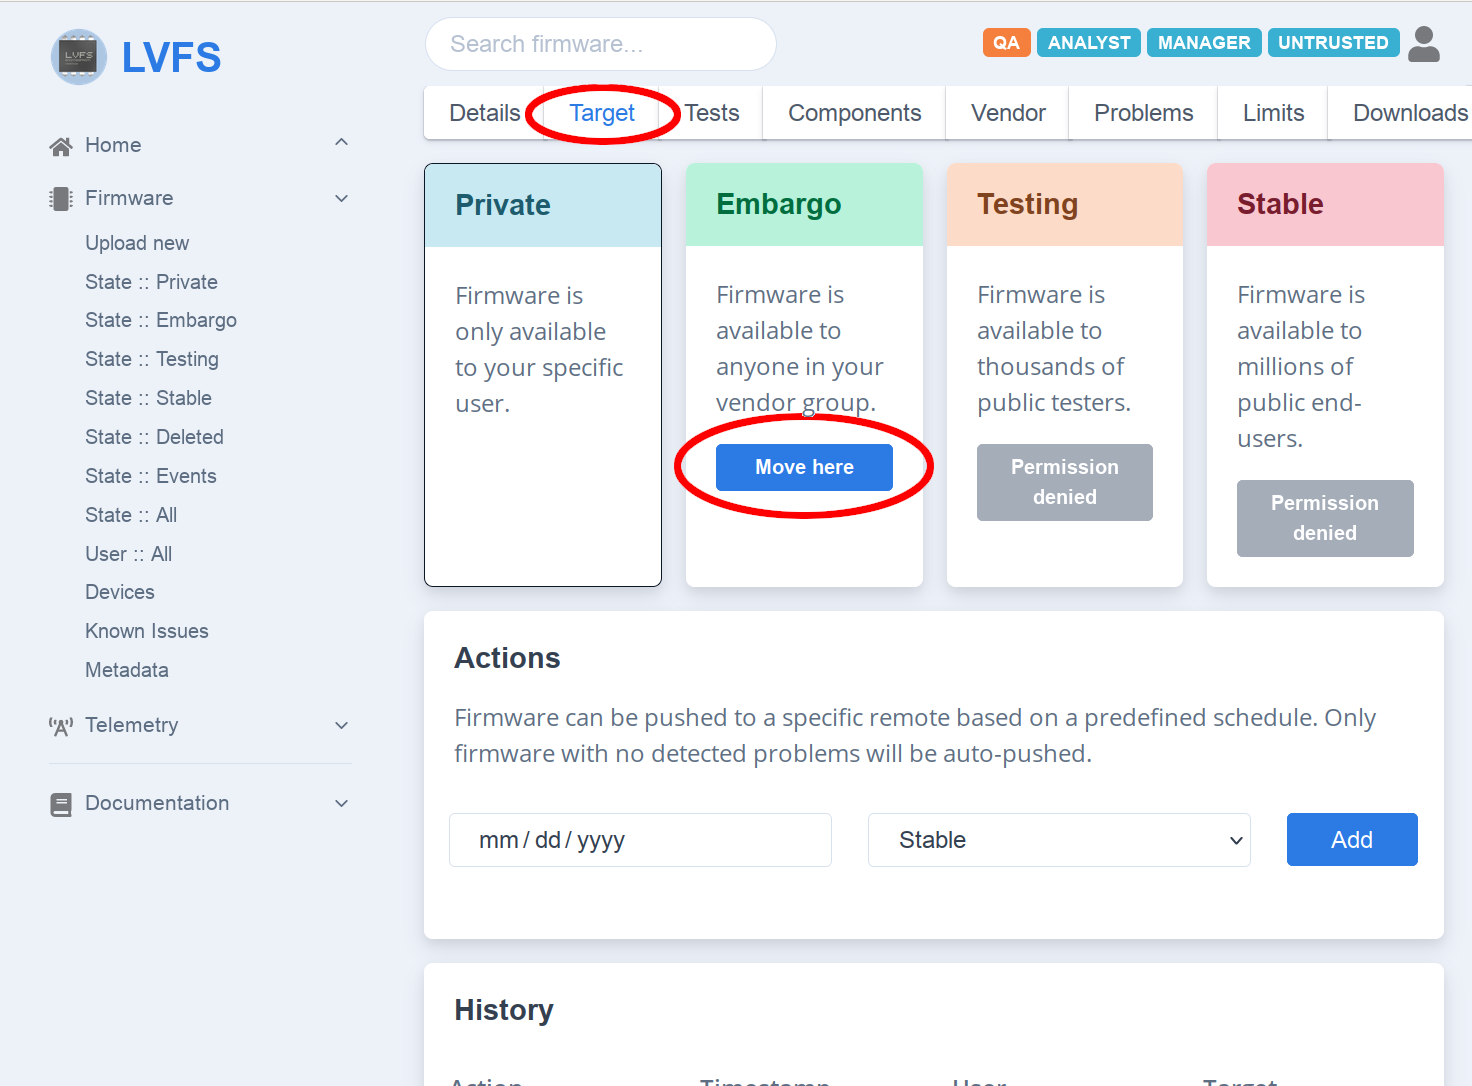
Choose the needed firmware from private repo (“Firmware” -> “State::Private”) and press the button details.
In the “Target” tab you will see the list of available remotes.
Press “Move here” button for “Embargo” remote:
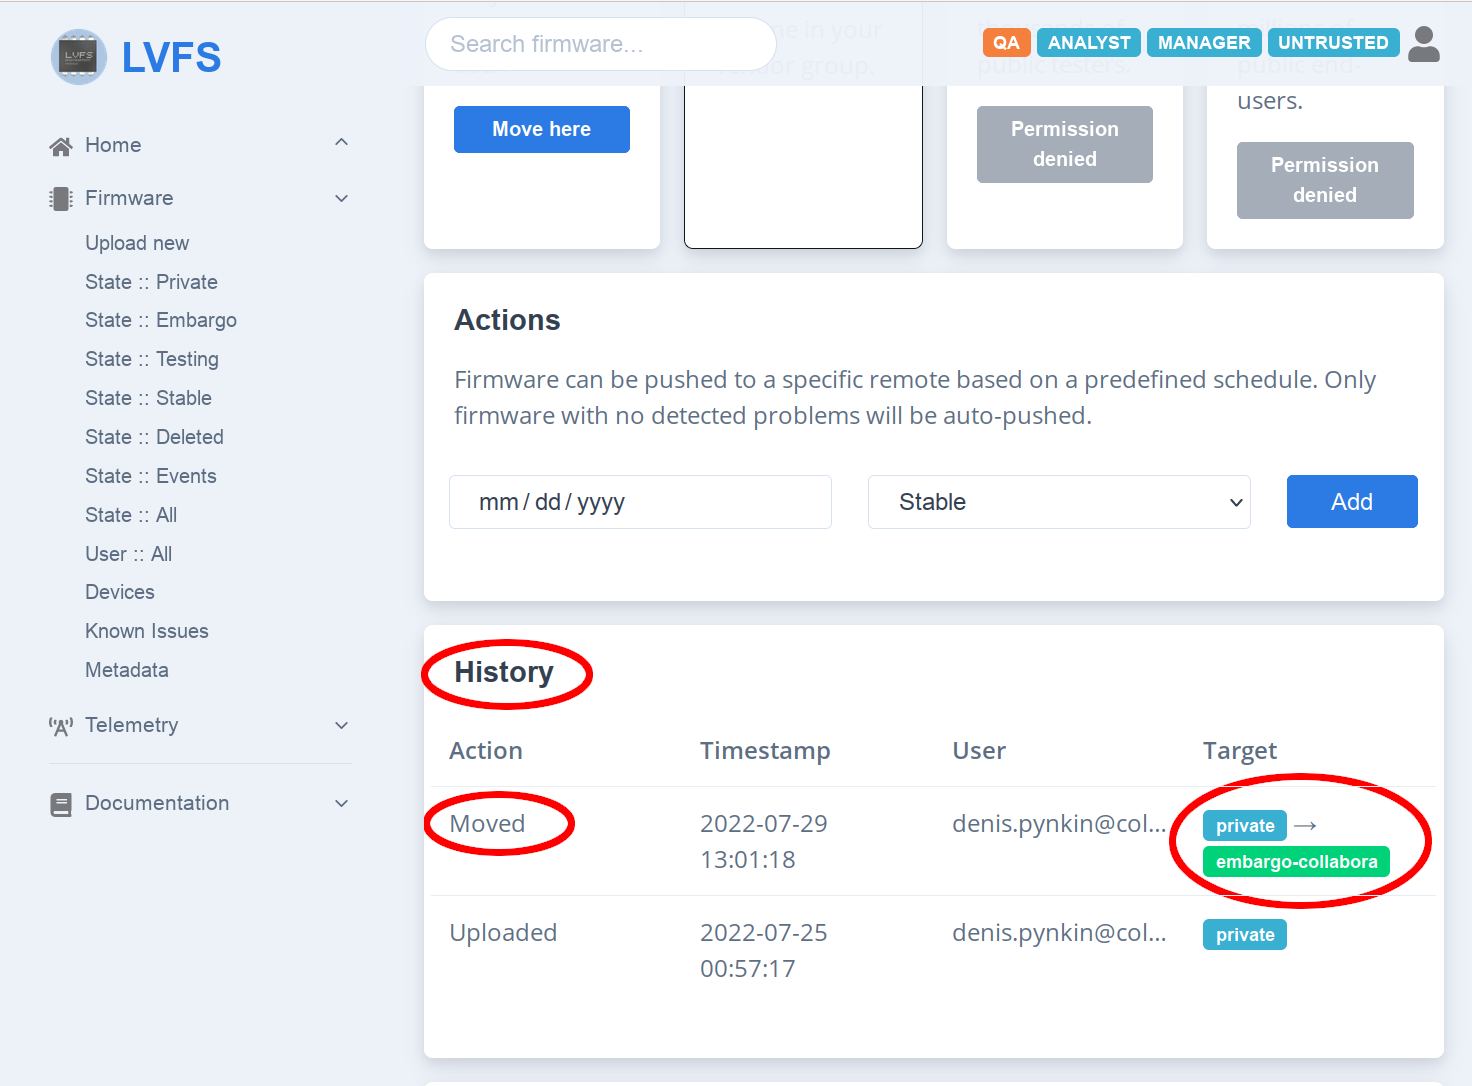
On the updated screen you need to scroll down the web page to “History” block to see the confirmation if the FW has been moved into the new remote:
Enable the embargoed remote
This is the one-time action needed for enabling the Embargo remote on the testing Chrome OS system.
Check on Chrome OS device if the remote is not available and not enabled already:
# fwupdmgr get-remotesIf there is the remote named
Embargoed for collaboraor similar and it is enabled (check the keyEnabled: true), probably the remote is configured already and you may proceed with Install the FW CAB file from the embargo remote .On LVFS site find the section “Metadata” – it would contain links to the recent versions of metadata for Embargo, Testing and Stable repositories.
However we are interesting in the configuration file for the Embargo remote of your company (
collabora-embargo.confin the example)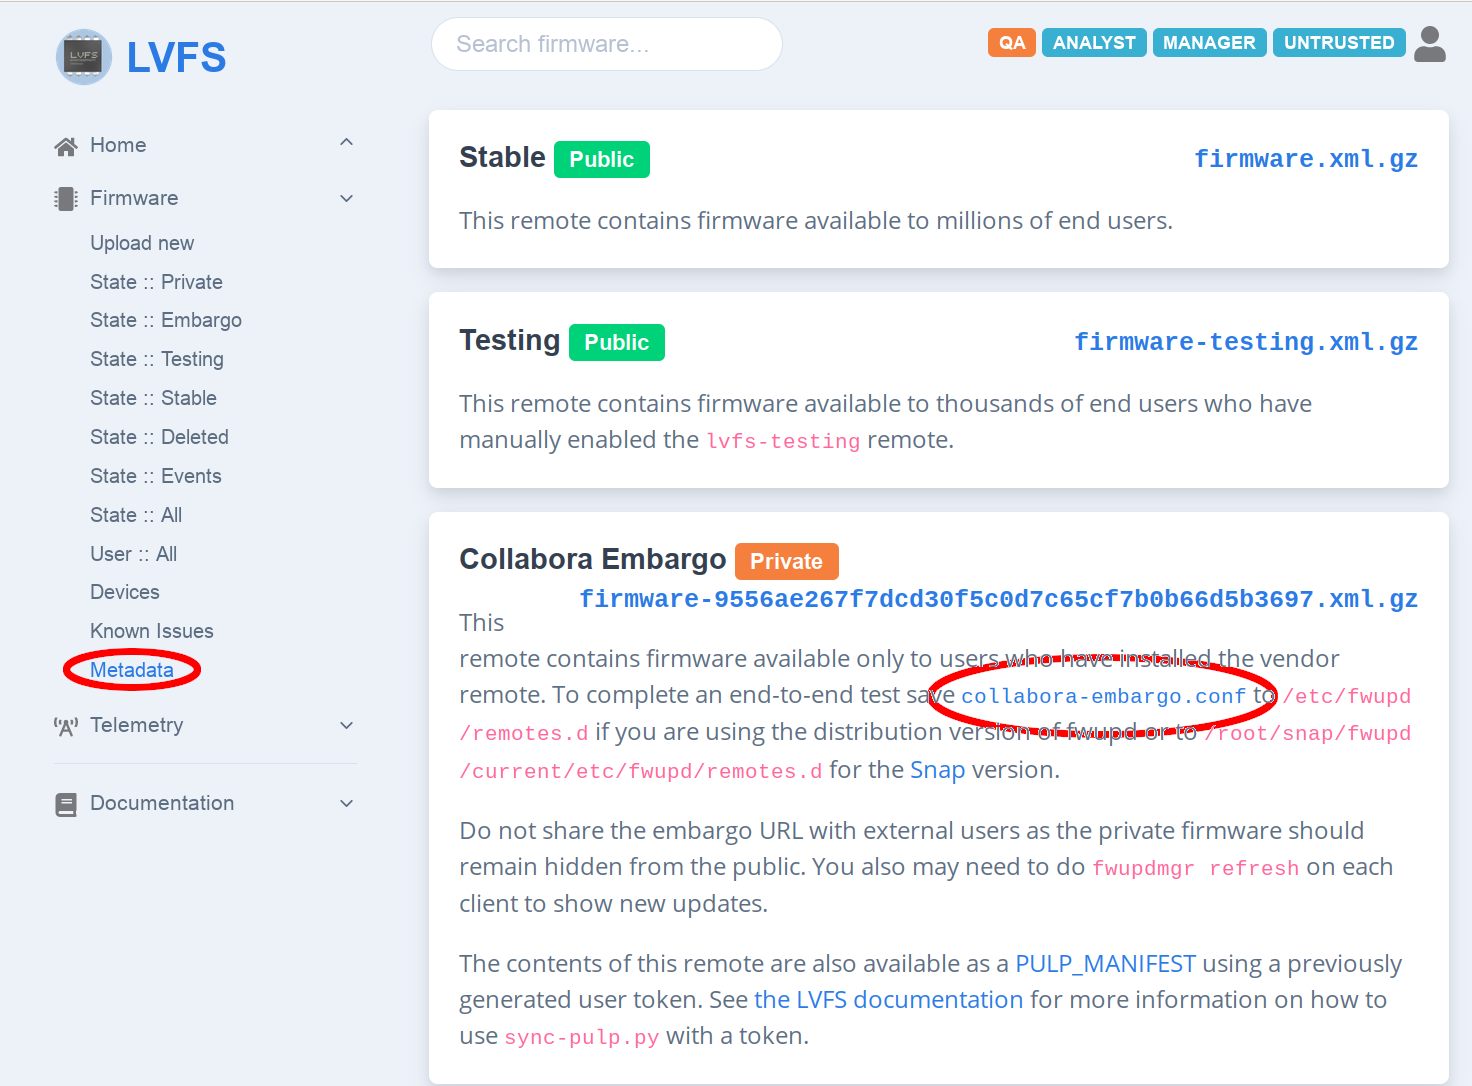
Download the configuration file for the embargoed remote by clicking the name.
Please keep in mind – this is the private file accessible for authorized users only!
You need to copy the downloaded file to the ChromeBook with any method available for you (mass-media device, ssh and others).
To copy the file from the workstation with
ssh, for instance:scp collabora-embargo.conf root@192.168.1.115:~/
Please use the correct file name and IP address of the target device!
On Chrome OS device you need to copy the file to configuration directory for
fwupddaemon:# cp -v collabora-embargo.conf /etc/fwupd/remotes.d/Restart the
fwupdservice on ChromeBook:# restart fwupd fwupd start/running, process 22697
Install the FW CAB file from the embargo remote
Refresh the metadata for embargoed remote:
# fwupdmgr refresh Updating collabora-embargo Downloading… [***************************************] Downloading… [***************************************] Downloading… [***************************************] Decompressing… [***************************************] Successfully downloaded new metadata: 6 local devices supported
Update with the FW available from Embargo remote:
# fwupdmgr update Devices with no available firmware updates: • DUTA42 • Generic Billboard Device ╔══════════════════════════════════════════════════════════════════════╗ ║ Upgrade ColorHug from 1.2.5 to 1.2.6? ║ ╠══════════════════════════════════════════════════════════════════════╣ ║ This release fixes prevents the firmware returning an error when the ║ ║ remote SHA1 hash was never sent. ║ ║ ║ ║ ColorHug and all connected devices may not be usable while updating. ║ ╚══════════════════════════════════════════════════════════════════════╝ Perform operation? [Y|n]: Y Downloading… [***************************************] Downloading… [***************************************] Less than one minute remaining… Downloading… [***************************************] Decompressing… [***************************************] Authenticating… [***************************************] Waiting… [***************************************] Less than one minute remaining… Successfully installed firmware
LVFS: Testing remote
The Testing remote provides the catalog of firmwares for public access, however only users explicitly enabled this remote will have access to published FWs.
Move the FW CAB file to testing remote
LVFS side is similar to Move the FW CAB file to embargoed remote , but the target is “Testing remote” and no need to download the file with remote configuration.
Enable testing remote
This is the one-time action needed for enabling the Testing remote for the Chrome OS system.
By default the Testing remote is already configured on Chrome OS but not enabled.
Check on Chrome OS device if the remote named
Linux Vendor Firmware Service (testing)is not enabled already:# fwupdmgr get-remotesCheck the key
Enabled:and if it is set totrueplease proceed with Install the FW CAB file with the testing remoteTo enable the testing remote, use text editor to edit configuration file to replace
Enabled=falsebyEnabled=truein/etc/fwupd/remotes.d/lvfs-testing.confor simply run the command below:# sed -i -e "s/^Enabled=false/Enabled=true/" /etc/fwupd/remotes.d/lvfs-testing.confRestart the
fwupddaemon:# restart fwupd fwupd start/running, process 9841
Install the FW CAB file with the testing remote
Refresh the metadata for testing remote:
# fwupdmgr refresh Updating lvfs-testing Downloading… [***************************************] Downloading… [***************************************] Successfully downloaded new metadata: 2 local devices supported
Update with the latest available FW from the testing remote:
# fwupdmgr update Devices with no available firmware updates: • DUTA42 • Generic Billboard Device ╔══════════════════════════════════════════════════════════════════════╗ ║ Upgrade ColorHug from 1.2.5 to 1.2.6? ║ ╠══════════════════════════════════════════════════════════════════════╣ ║ This release fixes prevents the firmware returning an error when the ║ ║ remote SHA1 hash was never sent. ║ ║ ║ ║ ColorHug and all connected devices may not be usable while updating. ║ ╚══════════════════════════════════════════════════════════════════════╝ Perform operation? [Y|n]: Y Downloading… [***************************************] Downloading… [***************************************] Authenticating… [***************************************] Waiting… [***************************************] Less than one minute remaining… Successfully installed firmware
LVFS: Stable remote
The Stable remote makes the FW available for all users of fwupd over the
World running on different operating systems (primarily Linux).
For the Chrome OS this repository isn’t enabled by default, so it is needed to enable Stable remote explicitly. This makes the stable remote similar to the testing one for the Chrome OS.
Google’s team is keeping its own mirror of LVFS, so the FW from the LVFS Stable remote will be published for Chrome OS users only after some time.
Move the FW CAB file to stable remote
LVFS side is similar to Move the FW CAB file to embargoed remote, but the target is “Stable remote” and no need to download the file with remote configuration.
Enable stable remote
This is the one-time action needed for enabling the stable remote for the Chrome OS system.
By default the stable remote is already configured on Chrome OS but not enabled.
Check on Chrome OS device if the remote named
Linux Vendor Firmware Serviceis not enabled already:# fwupdmgr get-remotesCheck the key
Enabled:and if it is set totrueplease proceed withEnable the stable remote, use text editor to edit configuration file to replace
Enabled=falsebyEnabled=truein/etc/fwupd/remotes.d/lvfs.confor simply run the command below:# sed -i -e "s/^Enabled=false/Enabled=true/" /etc/fwupd/remotes.d/lvfs.confRestart the
fwupddaemon:# restart fwupd fwupd start/running, process 20199
Install the FW CAB file with the stable remote
Refresh the metadata for stable remote:
# fwupdmgr refresh Updating lvfs Downloading… [***************************************] Downloading… [***************************************] Decompressing… [***************************************] Successfully downloaded new metadata: 0 local devices supported
Update with the latest available FW from the stable remote :
# fwupdmgr update
Persistent revisions
Mark all FW versions uploaded to LVFS and used for automatic tests as persistent (“preserve” button in LVFS).
This is needed to keep the uploaded versions used for tests and prevent from purging on the LVFS side.
Signed Reports
The firmware testing is described in documentation: https://lvfs.readthedocs.io/en/latest/testing.html#signed-reports .
After each update the fwupdmgr client tools allow the end user to submit a
“report” which is used by the firmware owner to validate the firmware deployment
is correct. Any failures can be analyzed and patterns found and the metadata can
be fixed. For instance, the failures might indicate that the required fwupd
version needs to be raised to a higher value, or that the update requires a
specific bootloader version.
It is expected that only F/W having signed reports would be automatically copied into the LVFS mirror for Chrome OS. To do this, the user must either upload the certificate from each machine used for testing, or hardcode a user token.
Uploading a signed report on ChromeOS is slightly different than on regular Linux
distributions as /etc is immutable and cannot be changed.
By creating a file /var/lib/fwupd/remotes.d/lvfs.conf in a mutable directory
the fwupd daemon will reload the information and disregard the immutable
/etc/fwupd/remotes.d/lvfs.conf contents.
[fwupd Remote] Enabled=true Title=Linux Vendor Firmware Service MetadataURI=https://cdn.fwupd.org/downloads/firmware-EMBARGO_HASH.xml.xz ReportURI=https://fwupd.org/lvfs/firmware/report Username=THE_USERNAME Password=THE_TOKEN
Where EMBARGO_HASH is the hash found in https://fwupd.org/lvfs/metadata/
The THE_USERNAME is your LVFS account email and THE_TOKEN is the token
generated in https://fwupd.org/lvfs/profile
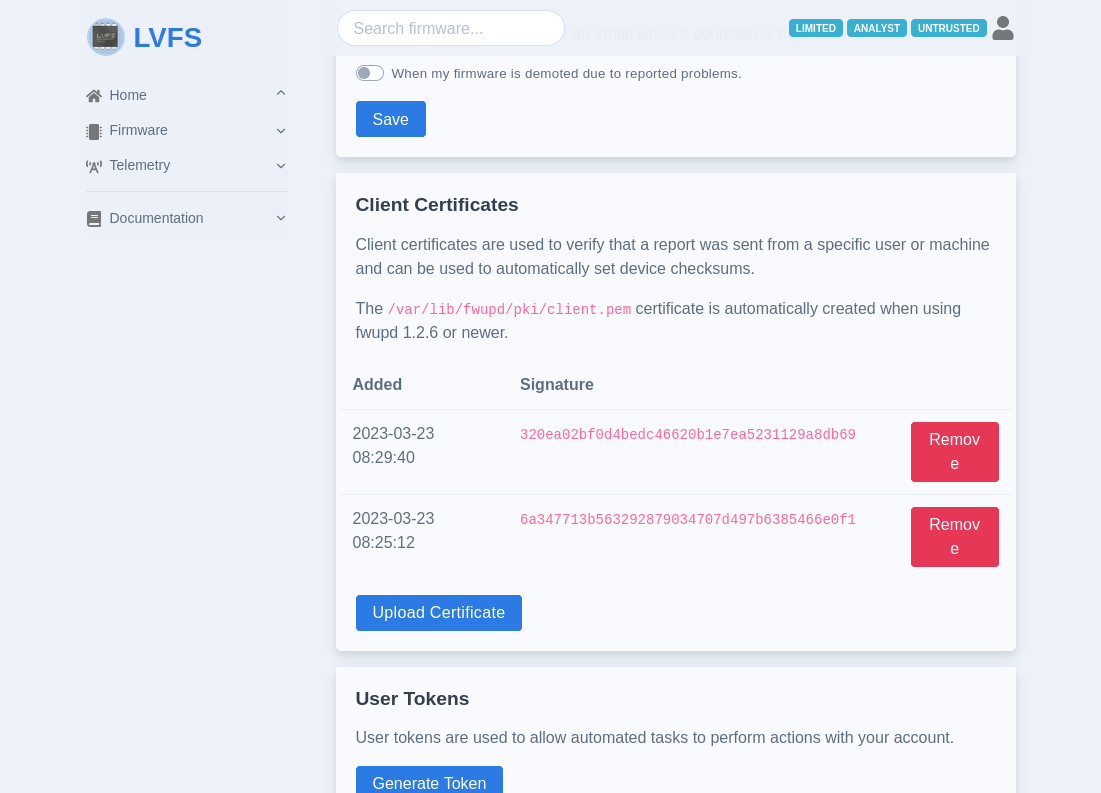
To use a host certificate rather than hardcoding Username and Password:
Go to the “Profile Settings”
Upload the
fwupdcertificate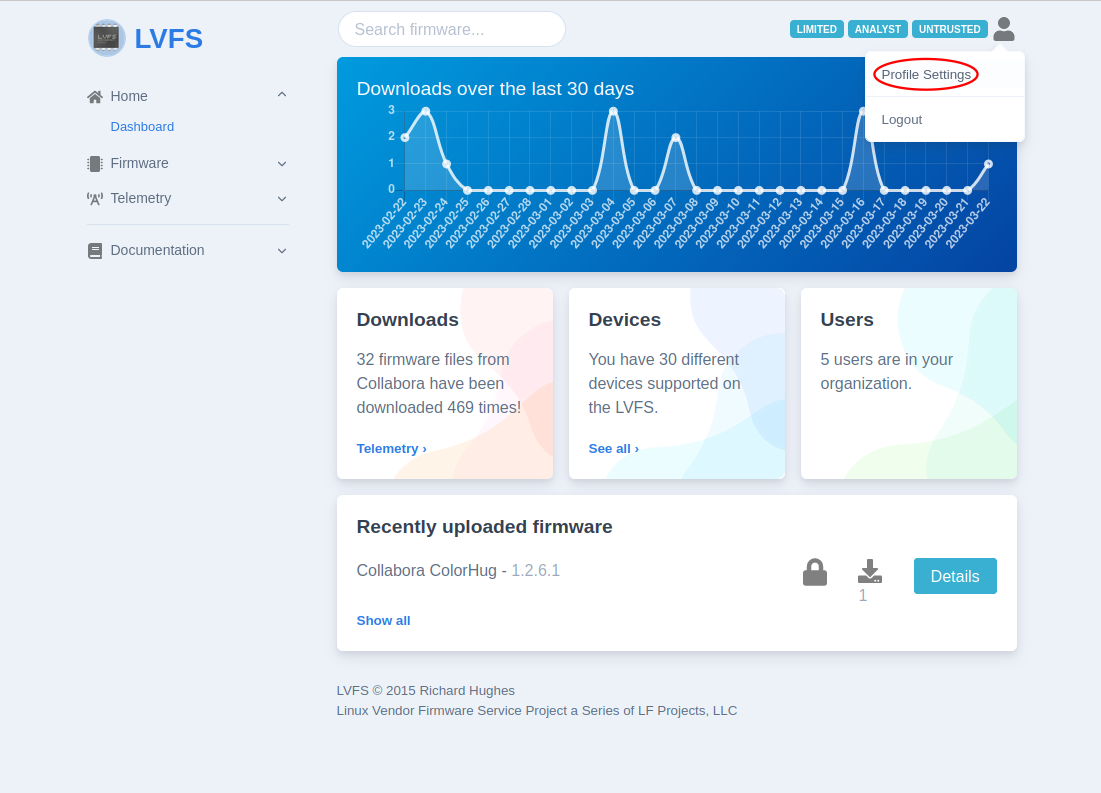
Warning
The metadata must now be downloaded from the embargo remote using
fwupdmgr refreshotherwise the messagehas no RemoteIDwill be seen usingfwupdmgr report-history --verbose
The user can then upload reports to the LVFS in a trusted way by signing the report:
$ fwupdmgr update # or fwupdmgr install foo.cab # …reboot if required…
If using a Username and Password, you must use:
$ fwupdmgr report-history
If using a host certificate, you must use:
$ fwupdmgr report-history --sign
USB device update record
Since fwupd version 1.8.11 it is possible to record the firmware update of
the USB devices. This can be used for a failing update to allow the plugin
developer to replay the update for debugging purposes .
Device record
Check the device availability and version
# fwupdmgr get-devicesEnable device emulation support, use text editor to edit configuration file to replace
AllowEmulation=falsebyAllowEmulation=truein/etc/fwupd/daemon.confor simply run the command below:# sed -i -e "s/^ AllowEmulation =false/ AllowEmulation =true/" /etc/fwupd/daemon.confRestart the
fwupddaemon:# restart fwupd fwupd start/running, process 20199
Copy the “Device ID:” or “GUID” value from the target device, for example:
├─ColorHug: │ Device ID: 23cf6368c14a875f74c38a5a423518f38d8abbbc │ Summary: An open source display colorimeter │ Current version: 1.2.5 │ Vendor: Hughski Ltd. (USB:0x273F) │ Install Duration: 8 seconds │ GUIDs: 40338ceb-b966-4eae-adae-9c32edfcc484 │ afdcc391-6c33-5914-b4d2-b4dd71fe9c5a
The Device ID is unique per device!!!
Register the device for recording using the “Device ID”:
# fwupdmgr emulation-tag 23cf6368c14a875f74c38a5a423518f38d8abbbcor the “GUID”:
# fwupdmgr emulation-tag 40338ceb-b966-4eae-adae-9c32edfcc484Remove and re-insert the device.
Upgrade the device to the newer version:
# fwupdmgr updateSave the records to an emulation file:
# fwupdmgr emulation-save colorhug.zipUnregister the device:
# fwupdmgr emulation-untag 23cf6368c14a875f74c38a5a423518f38d8abbbcDisable device emulation support, use text editor to edit configuration file to replace
AllowEmulation=truebyAllowEmulation=falsein/etc/fwupd/daemon.confor simply run the command below:# sed -i -e "s/^ AllowEmulation =true/ AllowEmulation =false/" /etc/fwupd/daemon.confRestart the
fwupddaemon:# restart fwupd fwupd start/running, process 20199
The emulation file can now be sent to the plugin developer.
Device emulation
Enable device emulation support, use text editor to edit configuration file to replace
AllowEmulation=falsebyAllowEmulation=truein/etc/fwupd/daemon.confor simply run the command below:# sed -i -e "s/^ AllowEmulation =false/ AllowEmulation =true/" /etc/fwupd/daemon.confRestart the
fwupddaemon:# restart fwupd fwupd start/running, process 20199
Load the emulated device:
# fwupdmgr emulation-load colorhug.zipCheck the device availability and version
localhost ~ # fwupdmgr get-devices Nightfury │ ├─ColorHug: │ Device ID: d9c9e0eb29c6f35160d400949c14db42f473f4d4 │ Summary: An open source display colorimeter │ Current version: 1.2.5 │ Vendor: Hughski Ltd. (USB:0x273F) │ Install Duration: 8 seconds │ GUIDs: 40338ceb-b966-4eae-adae-9c32edfcc484 │ afdcc391-6c33-5914-b4d2-b4dd71fe9c5a │ 6bc5ff27-d631-5660-9991-6d24954c6f90 ← USB\VID_273F&PID_1001 │ 4841a9e4-e5c8-5107-a83e-d6c6d9c21248 ← USB\VID_273F&PID_1001&REV_0002 │ Device Flags: • Updatable │ • Supported on remote server │ • Device can recover flash failures │ • Unsigned Payload │ • Emulated
Upgrade the device to the newer version:
# fwupdmgr updateDisable device emulation support, use text editor to edit configuration file to replace
AllowEmulation=truebyAllowEmulation=falsein/etc/fwupd/daemon.confor simply run the command below:# sed -i -e "s/^ AllowEmulation =true/ AllowEmulation =false/" /etc/fwupd/daemon.confRestart the
fwupddaemon:# restart fwupd fwupd start/running, process 20199
Updates with LVFS
Update with GUI
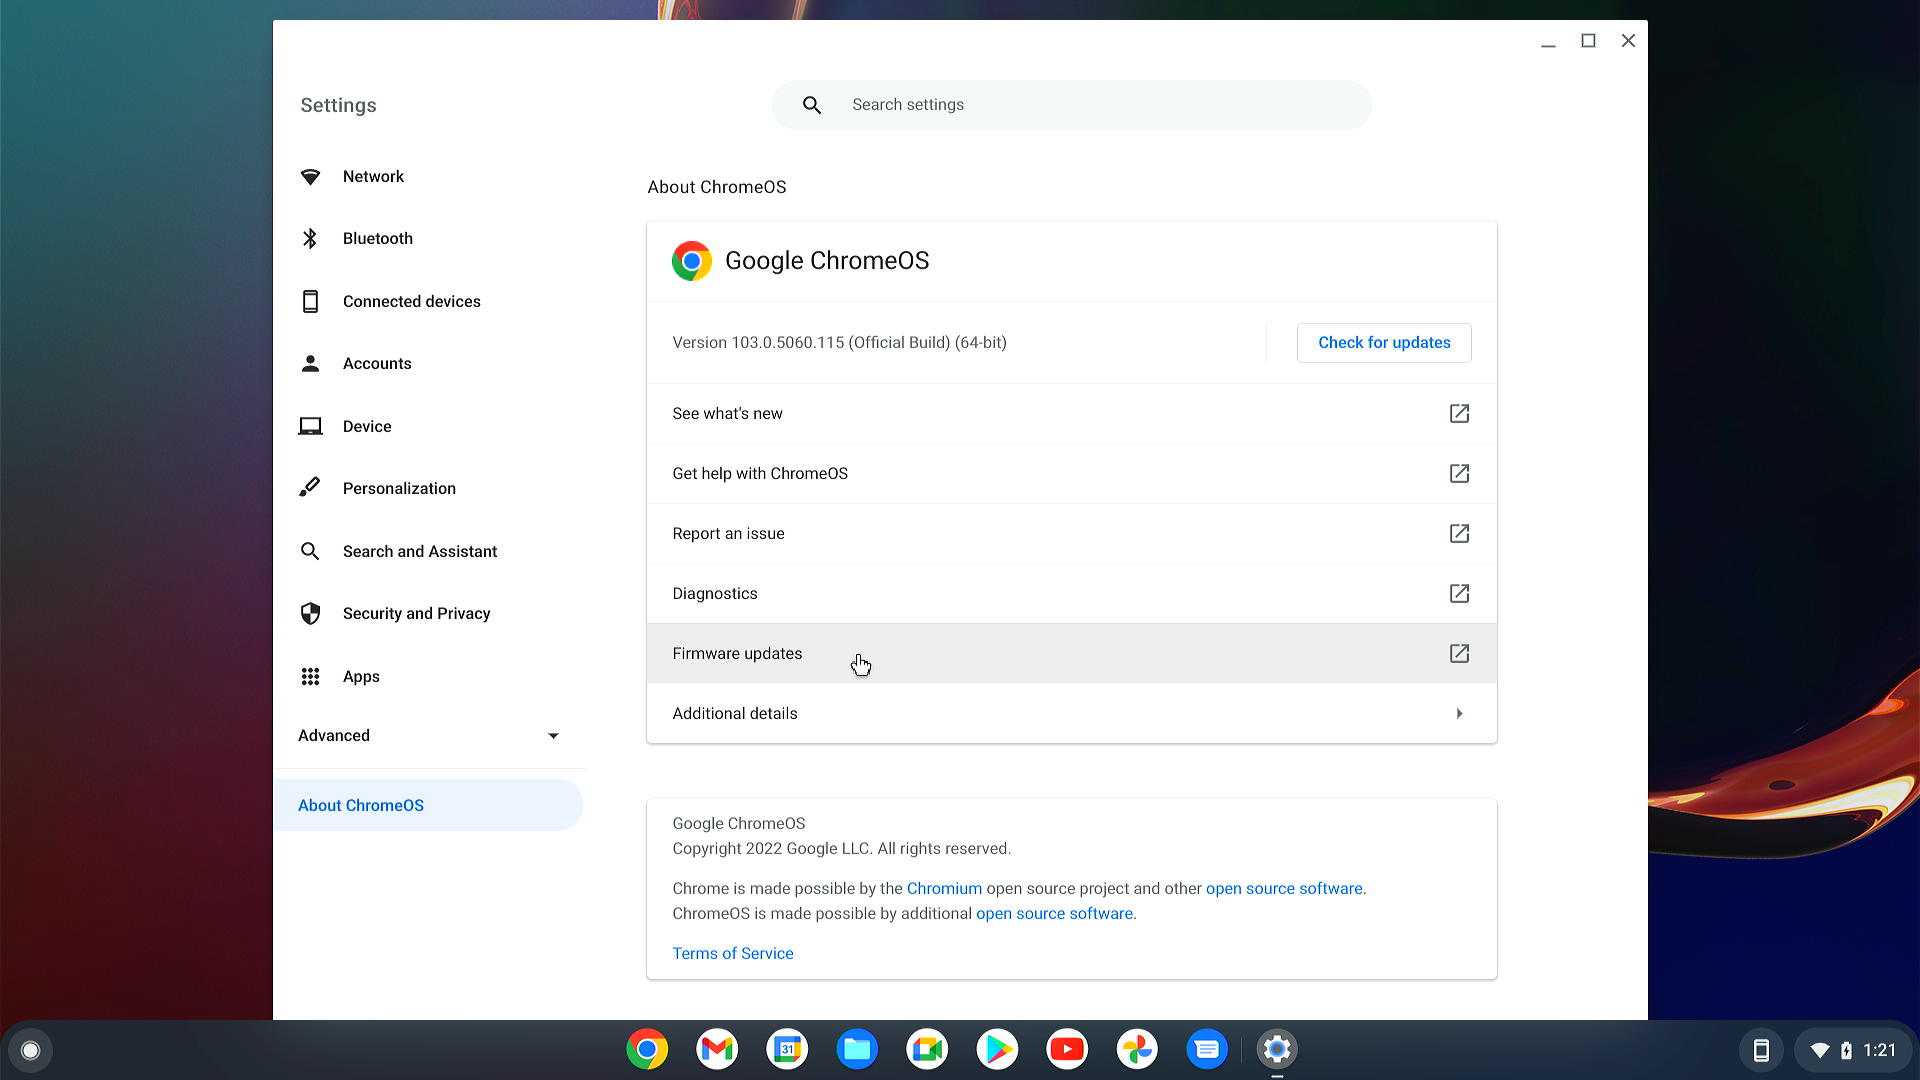
Go to “Settings”
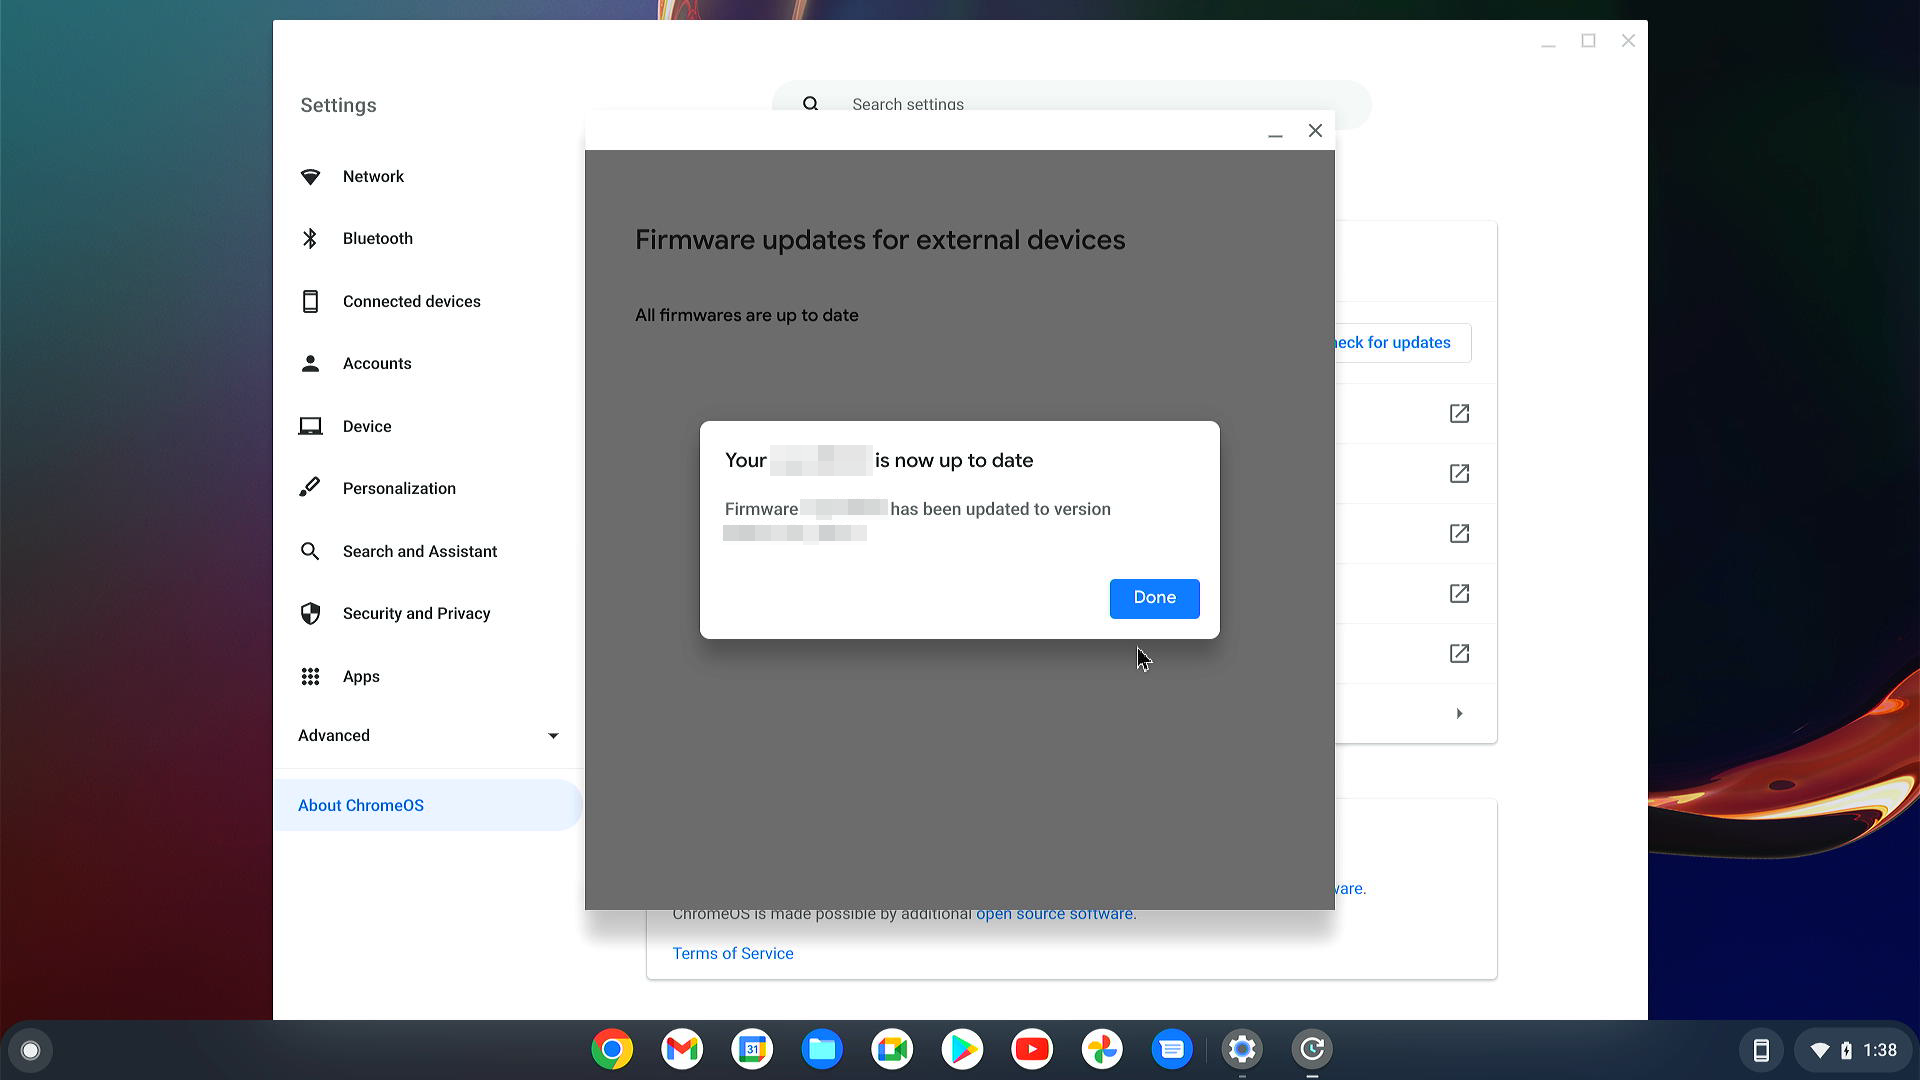
Press “About Chrome OS” and if the update is available – find the button “Firmware updates” and press it:
If the update for the connected device is available you will see it in the list of pop-up window and will be able to update:

In case of successful update you should to see the appropriate message:
If something goes wrong during update, the error message should appeared:

Update with console
Check the device availability and version
Run the command fwupdmgr get-devices to gain the list of attached devices.
#  fwupdmgr get-devices
Nightfury
│
├─ColorHug:
│         Device ID:         23cf6368c14a875f74c38a5a423518f38d8abbbc
│         Summary:           An open source display colorimeter
│         Current version:   1.2.5
│         Vendor:            Hughski Ltd. (USB:0x273F)
│         Install Duration:  8 seconds
│         Update State:      Success
│         GUIDs:             40338ceb-b966-4eae-adae-9c32edfcc484
│                            afdcc391-6c33-5914-b4d2-b4dd71fe9c5a
│                            6bc5ff27-d631-5660-9991-6d24954c6f90 ← USB\VID_273F&PID_1001
│                            4841a9e4-e5c8-5107-a83e-d6c6d9c21248 ← USB\VID_273F&PID_1001&REV_0002
│         Device Flags:      • Updatable
│                            • Supported on remote server
│                            • Device can recover flash failures
│                            • Unsigned Payload
Update the selected device
It is possible to update the single selected device by Device ID listed in Check the device availability to the last available FW version:
# fwupdmgr update 23cf6368c14a875f74c38a5a423518f38d8abbbc
Devices with no available firmware updates:
• DUTA42
• Generic Billboard Device
╔═══════════════════════════════════════════════════════════════════════════╗
║ Upgrade ColorHug from 1.2.5 to 1.2.6?                                     ║
╠═══════════════════════════════════════════════════════════════════════════╣
║ This release fixes prevents the firmware returning an error when the      ║
║ remote SHA1 hash was never sent.                                          ║
║                                                                           ║
║ ColorHug and all connected devices may not be usable while updating.      ║
╚═══════════════════════════════════════════════════════════════════════════╝
Perform operation? [Y|n]:
Downloading…             [***************************************]
Downloading…             [***************************************]
Authenticating…          [***************************************]
Waiting…                 [***************************************]
Successfully installed firmware
Update all supported devices
If you want to update all supported devices attached to the ChromeBook, just run
fwupdmgr update to apply any FW update available from the enabled remote:
#  fwupdmgr update
Devices with no available firmware updates:
• DUTA42
• Generic Billboard Device
╔═══════════════════════════════════════════════════════════════════════════╗
║ Upgrade ColorHug from 1.2.5 to 1.2.6?                                     ║
╠═══════════════════════════════════════════════════════════════════════════╣
║ This release fixes prevents the firmware returning an error when the      ║
║ remote SHA1 hash was never sent.                                          ║
║                                                                           ║
║ ColorHug and all connected devices may not be usable while updating.      ║
╚═══════════════════════════════════════════════════════════════════════════╝
Perform operation? [Y|n]: y
Downloading…             [***************************************]
Downloading…             [***************************************]
Decompressing…           [***************************************]
Authenticating…          [***************************************]
Waiting…                 [***************************************] Less than one minute remaining…
Successfully installed firmware
Downgrade the FW version
If several versions of the FW are available from enabled remote(s) it is possible to perform downgrade to any available version lower than the current by selection via the proposed menu. If only the single version for downgrade is available you will need only to confirm the operation:
# fwupdmgr downgrade 23cf6368c14a875f74c38a5a423518f38d8abbbc
0.    Cancel
1.    1.2.5
2.    1.2.4
3.    1.2.3
4.    1.2.2
5.    1.2.0
Choose release [0-5]: 1
╔═══════════════════════════════════════════════════════════════════════════╗
║ Downgrade ColorHug from 1.2.6 to 1.2.5?                                   ║
╠═══════════════════════════════════════════════════════════════════════════╣
║ This release fixes the firmware package to work with new versions of      ║
║ fwupd.                                                                    ║
║                                                                           ║
║ ColorHug and all connected devices may not be usable while updating.      ║
╚═══════════════════════════════════════════════════════════════════════════╝
Perform operation? [Y|n]:
Downloading…             [***************************************]
Downloading…             [***************************************]
Downloading…             [***************************************]
Authenticating…          [***************************************]
Waiting…                 [***************************************]
Successfully installed firmware
Test cases
For tests in this section please use CAB files listed in section List of FWs used in this doc or prepare own CAB files and upload it to appropriate remote as described in LVFS section.
Variables for test cases
Most of the test cases are the same for all the HW, only CAB files and versions are different. To unify the test cases for all devices, some variables are defined and used in test cases for any device:
OLDCAB – URL or path to the CAB file of the previous version
NEWCAB – URL or path to the CAB file of the target version
For instance for ColorHug it is required to define URL to CAB files with
export command prior the test:
# export OLDCAB=https://fwupd.org/downloads/9a4e77009da7d3b5f15a1388afeb9e5d41a5a8ae-hughski-colorhug2-1.2.5.cab

# export NEWCAB=https://fwupd.org/downloads/c6fbb716abbb204d98f12edf1f146b6406f39b1eade741b353c15a86f5da8278-hughski-colorhug-1.2.6.cab
The example above sets the OLDCAB variable to the URL of the CAB file with FW version 1.2.5, and the NEWCAB to the URL of the CAB file with FW version 1.2.6.
Test the FW from the private remote
Preconditions
Enable access to ChromeBook
2 FW CAB files uploaded to LVFS required (from the List of FWs used in this doc)
Export variables for test cases
The target device connected to Chromebook (ColorHug in this example)
Steps
Check the device availability and version
# fwupdmgr get-devicesDowngrade the device to the older version (parameter
--allow-olderis mandatory):# fwupdmgr install ${OLDCAB} --allow-olderExpected result: last string must be
Successfully installed firmware
Check the device availability and version
# fwupdmgr get-devicesVersion of the FW must be equal to older release.
Upgrade the device to the newer version:
# fwupdmgr install ${NEWCAB}Expected result: last string must be
Successfully installed firmware
Check the device availability and version
# fwupdmgr get-devicesVersion of the FW must be equal to the target release.
Test the FW from the embargoed remote
Preconditions
Enable access to ChromeBook
Export “OLDCAB” variable for test cases (“NEWCAB” is not needed for this test)
The target device connected to Chromebook
Steps
Check the device availability and version
# fwupdmgr get-devicesDowngrade the device to the older version (parameter
--allow-olderis mandatory):# fwupdmgr install ${OLDCAB} --allow-olderExpected result: last string must be
Successfully installed firmware
Check the device availability and version
# fwupdmgr get-devicesVersion of the FW must be equal to older release.
Install the FW CAB file from the embargo remote
Refresh the metadata for embargoed remote:
# fwupdmgr refreshExpected result: last string must be
Successfully downloaded new metadata: 6 local devices supported
where the amount of supported devices might vary
Update with the FW available from Embargo remote:
# fwupdmgr updateExpected result: last string must be
Successfully installed firmware
Check the device availability and version
# fwupdmgr get-devicesVersion of the FW must be equal to the target release.
Test the FW from the testing remote
Preconditions
Enable access to ChromeBook
Export “OLDCAB” variable for test cases (“NEWCAB” is not needed for this test)
The target device connected to Chromebook
Steps
Check the device availability and version
# fwupdmgr get-devicesDowngrade the device to the older version (parameter
--allow-olderis mandatory):# fwupdmgr install ${OLDCAB} --allow-olderExpected result: last string must be
Successfully installed firmware
Check the device availability and version
# fwupdmgr get-devicesVersion of the FW must be equal to older release.
Install the FW CAB file with the testing remote
Refresh the metadata for testing remote:
# fwupdmgr refreshExpected result: last string must be
Successfully downloaded new metadata: 6 local devices supported
where the amount of supported devices might vary
Update with the FW available from Testing remote:
# fwupdmgr updateExpected result: last string must be
Successfully installed firmware
Check the device availability and version
# fwupdmgr get-devicesVersion of the FW must be equal to the target release.
Test the FW from the stable remote
Preconditions
Enable access to ChromeBook
Export “OLDCAB” variable for test cases (“NEWCAB” is not needed for this test)
The target device connected to Chromebook
Steps
Check the device availability and version
# fwupdmgr get-devicesDowngrade the device to the older version (parameter
--allow-olderis mandatory):# fwupdmgr install ${OLDCAB} --allow-olderExpected result: last string must be
Successfully installed firmware
Check the device availability and version
# fwupdmgr get-devicesVersion of the FW must be equal to older release.
Install the FW CAB file with the stable remote
Refresh the metadata for stable remote:
# fwupdmgr refreshExpected result: last string must be
Successfully downloaded new metadata: 6 local devices supported
where the amount of supported devices might vary.
Update with the FW available from Stable remote:
# fwupdmgr updateExpected result: last string must be
Successfully installed firmware
Check the device availability and version
# fwupdmgr get-devicesVersion of the FW must be equal to the target release.
Test GUI update with Google internal remote
Preconditions
Enable access to ChromeBook
Export “OLDCAB” variable for test cases (“NEWCAB” is not needed for this test)
The target FW must exist in Google internal remote
The target device connected to Chromebook
Steps
Check the device availability and version
# fwupdmgr get-devicesDowngrade the device to the older version (parameter
--allow-olderis mandatory):# fwupdmgr install ${OLDCAB} --allow-olderExpected result: last string must be
Successfully installed firmware
Check the device availability and version
# fwupdmgr get-devicesVersion of the FW must be equal to older release.
Switch to the Chrome OS UI if you are in linux console:
switch to the linux console on ChromeBook by pressing: “Ctrl + Alt + ←” (‘←’ or ‘F1’ on top row).
After downgrading it is possible to update the device with GUI to the last available version :
go to “Settings” -> “About Chrome OS” -> “Firmware update”
Test GUI update with embargoed remote
Preconditions
Enable access to ChromeBook
Export “OLDCAB” variable for test cases (“NEWCAB” is not needed for this test)
The target device connected to Chromebook
Steps
Check the device availability and version
# fwupdmgr get-devicesDowngrade the device to the older version (parameter
--allow-olderis mandatory):# fwupdmgr install ${OLDCAB} --allow-olderExpected result: last string must be
Successfully installed firmware
Check the device availability and version
# fwupdmgr get-devicesVersion of the FW must be equal to older release.
Refresh the metadata from the remote:
# fwupdmgr refresh --forceSwitch to the Chrome OS UI if you are in linux console:
switch to the linux console on ChromeBook by pressing: “Ctrl + Alt + ←” ( ‘←’ or ‘F1’ on top row).
After downgrading it is possible to update the device with GUI to the last available version :
go to “Settings” -> “About Chrome OS” -> “Firmware update”
Test GUI update with testing remote
Preconditions
Enable access to ChromeBook
Export “OLDCAB” variable for test cases (“NEWCAB” is not needed for this test)
The target device connected to Chromebook
Steps
Check the device availability and version
# fwupdmgr get-devicesDowngrade the device to the older version (parameter
--allow-olderis mandatory):# fwupdmgr install ${OLDCAB} --allow-olderExpected result: last string must be
Successfully installed firmware
Check the device availability and version
# fwupdmgr get-devicesVersion of the FW must be equal to older release.
Refresh the metadata from the remote:
# fwupdmgr refresh --forceSwitch to the Chrome OS UI if you are in linux console:
switch to the linux console on ChromeBook by pressing: “Ctrl + Alt + ←” ( ‘←’ or ‘F1’ on top row).
After downgrading it is possible to update the device with GUI to the last available version :
go to “Settings” -> “About Chrome OS” -> “Firmware update”
Test GUI update with stable remote
Preconditions
Enable access to ChromeBook
Export “OLDCAB” variable for test cases (“NEWCAB” is not needed for this test)
The target device connected to Chromebook
Steps
Check the device availability and version
# fwupdmgr get-devicesDowngrade the device to the older version (parameter
--allow-olderis mandatory):# fwupdmgr install ${OLDCAB} --allow-olderExpected result: last string must be
Successfully installed firmware
Check the device availability and version
# fwupdmgr get-devicesVersion of the FW must be equal to older release.
Refresh the metadata from the remote:
# fwupdmgr refresh --forceSwitch to the Chrome OS UI if you are in linux console:
switch to the linux console on ChromeBook by pressing: “Ctrl + Alt + ←” ( ‘←’ or ‘F1’ on top row).
After downgrading it is possible to update the device with GUI to the last available version :
go to “Settings” -> “About Chrome OS” -> “Firmware update”
Recovery from the failed update with CLI
Preconditions
Enable access to ChromeBook
2 FW CAB files uploaded to LVFS required (from the List of FWs used in this doc)
Export variables for test cases
The target device connected to Chromebook (ColorHug in this example)
Steps
Check the device availability and version
# fwupdmgr get-devicesDowngrade the device to the older version (parameter
--allow-olderis mandatory):# fwupdmgr install ${OLDCAB} --allow-olderExpected result: last string must be
Successfully installed firmware
Check the device availability and version
# fwupdmgr get-devicesCopy the “Device ID:” value from the target device, for example:
├─ColorHug:
│         Device ID:        23cf6368c14a875f74c38a5a423518f38d8abbbc
│         Summary:          An open source display colorimeter
│         Current version:  1.2.5
The Device ID is unique per device!!!
Put the device into bootloader mode.
Please use the ID of the target device detected on the previous step!!!
# fwupdtool detach 23cf6368c14a875f74c38a5a423518f38d8abbbcThe device must notify it is in bootloader mode with blinking LED.
Check the device availability and version
# fwupdmgr get-devicesExpected result: the device flag
Is in bootloader modemust exists├─ColorHug: │ Device ID: 23cf6368c14a875f74c38a5a423518f38d8abbbc │ Summary: An open source display colorimeter │ Current version: 1.2.5 │ Vendor: Hughski Ltd. (USB:0x273F) │ Install Duration: 8 seconds │ GUIDs: 40338ceb-b966-4eae-adae-9c32edfcc484 │ afdcc391-6c33-5914-b4d2-b4dd71fe9c5a │ 6bc5ff27-d631-5660-9991-6d24954c6f90 ← USB\VID_273F&PID_1001 │ 4841a9e4-e5c8-5107-a83e-d6c6d9c21248 ← USB\VID_273F&PID_1001&REV_0002 │ Device Flags: • Updatable │ • Supported on remote server │ • Device can recover flash failures │ • Is in bootloader mode │ • Unsigned Payload
Upgrade the device to the newer version:
# fwupdmgr install ${NEWCAB}Expected result: last string must be
Successfully installed firmware
Check the device availability and version
# fwupdmgr get-devicesVersion of the FW must be equal to the target release.
Test the FW reinstall
Preconditions
Enable access to ChromeBook
Export “NEWCAB” variable for test cases (“OLDCAB” is not needed for this test)
The target device connected to Chromebook (ColorHug in this example)
7.11.2. Steps
Check the device availability and version
# fwupdmgr get-devicesUpdate the device to the target CAB:
# fwupdmgr install ${NEWCAB}Expected result: last string must be either
Successfully installed firmware…
OR
All updatable firmware is already installed
Check the device availability and version
# fwupdmgr get-devicesVersion of the FW must be equal to the target release.
Re-install the FW for all subdevices with the target release:
# fwupdmgr install ${NEWCAB} --allow-reinstallExpected result: last string must be
Successfully installed firmware
Check the device availability and version
# fwupdmgr get-devicesVersion of the FW must be equal to the target release.
Appendix A: List of FWs used in this doc
This is the list of FWs uploaded to LVFS and available for downloading and testing.
ColorHug
1.2.5
https://fwupd.org/downloads/9a4e77009da7d3b5f15a1388afeb9e5d41a5a8ae-hughski-colorhug2-1.2.5.cab
1.2.6
# export OLDCAB=https://fwupd.org/downloads/9a4e77009da7d3b5f15a1388afeb9e5d41a5a8ae-hughski-colorhug2-1.2.5.cab
# export NEWCAB=https://fwupd.org/downloads/c6fbb716abbb204d98f12edf1f146b6406f39b1eade741b353c15a86f5da8278-hughski-colorhug-1.2.6.cab